How to export a video from After Effects
Export an H.264 MP4 directly from the Render Queue, or use Media Encoder to keep working. Choose bitrate, include audio and render the intended composition or work area.

To export an MP4 from After Effects, select the composition in the Project panel and choose Composition > Add to Render Queue. Click the text beside Output Module, choose H.264 from the Format menu and click OK. Set the file name and folder in Output To, then click Render at the upper right of the Render Queue panel.
I'd use this direct route for a finished comp because it makes the MP4 inside After Effects. Choose Adobe Media Encoder instead when you want to keep working in After Effects during the encode or need its extra presets; it is a separate application and must be installed.
The comp and the panels before anything is queued
A render reads the composition as it stands at that moment, so four things are worth settling first.
- The right comp is selected. Composition > Add to Render Queue works on the comp selected in the Project panel. Adobe's list of default shortcuts also has Ctrl + Shift + / (Command + Shift + / on a Mac), which adds the active composition or the selected items to the Render Queue, handy when the comp is already open in the Timeline panel.
- The comp's length is the video's length, or you know which part you want. How much gets written is the Time Span setting of the render item: Length Of Comp, Work Area Only or Custom. If the comp runs on past the last frame you need, set the work area around the wanted stretch (shown further down) or shorten the comp with Trim Comp to Work Area, Ctrl + Shift + X (Command + Shift + X). Trimming changes the comp itself, so stay with the work area if you still need the tail later.
- The sound is in the comp. Check that the comp contains the sound you expect, then check Audio Output in the output module. Include audio for a comp with sound; leave it off for a silent comp.
- The Render Queue panel is reachable. Window > Render Queue opens it, and Ctrl + Alt + 0 (Command + Option + 0) opens or closes it.
Where the current-time indicator stands makes no difference to a full-length render. It matters only when you set a work area, because B and N place the work area's start and end at the indicator.
Decide where the file goes next
Choose the settings for the file's next stop. Adobe's guide to rendering and exporting splits the job in two: a high-quality movie for Premiere Pro or another application, and a compressed movie for the web or disc. For a final product it says to weigh the medium against file size and data rate; for an intermediate one, to output without compression in a format the editing system accepts. On this site those are the delivery file and the master file.
| Setting | Delivery file for viewers | Master file for the next edit |
|---|---|---|
| Container and codec | MP4 with H.264 | The Lossless output module template, or a suitable Apple ProRes codec |
| Frame size | The comp's, unless the platform asks for another | The comp's |
| Frame rate | Use Comp's Frame Rate | Use Comp's Frame Rate |
| Bitrate | An H.264 preset at 5, 15 or 40 Mbps, starting at 15 | Not the deciding setting: quality comes before size |
| Audio | Include audio when the comp has sound | Include audio when the comp has sound |
| Transparency | Channels RGB | Channels RGB + Alpha, with a codec that supports alpha |
For a title that needs transparency over another video, choose a codec that supports alpha and set Channels to RGB + Alpha. Apple ProRes is a codec family, so check the specific variant rather than assuming every ProRes export retains transparency. The Lossless template is intended for transfer to video, film or an editing application.
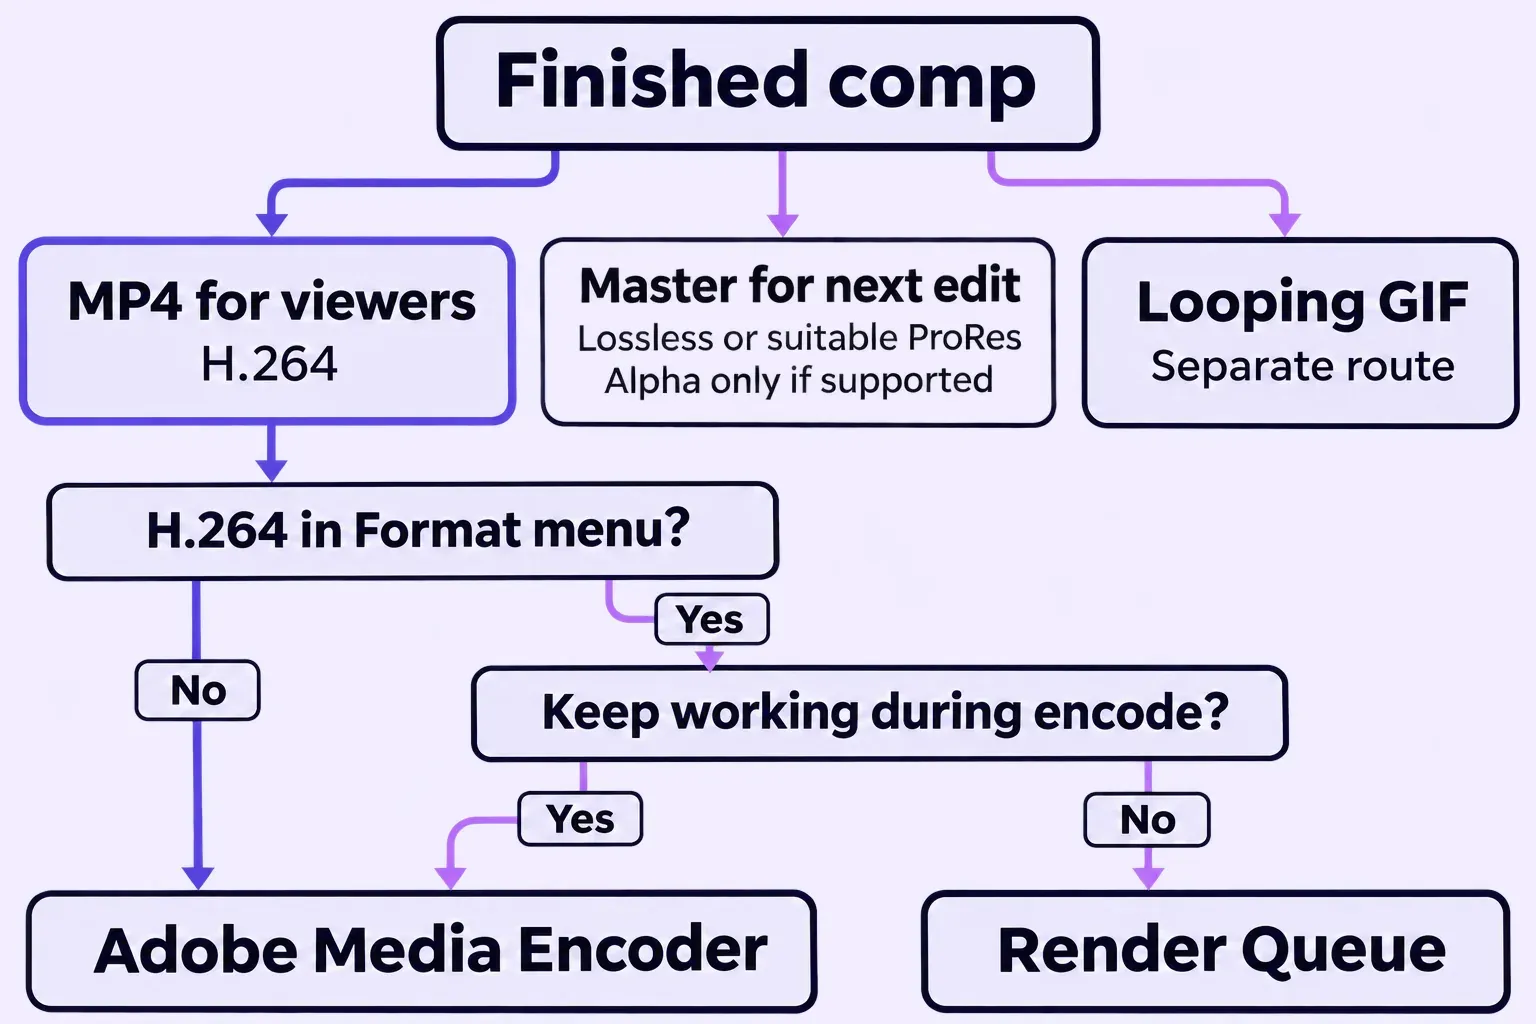

A GIF loop needs a different export workflow. For an editable project handoff, File > Dependencies > Collect Files copies the project and the footage selected by its Collect Source Files scope into a new folder; it does not create a finished movie.
Need the MP4 and the master from the same comp? One render item can carry more than one output module: click the + button to the left of Output To, or choose Composition > Add Output Module. I'd add the second file that way rather than queue the comp twice, because both outputs then share one set of render settings, and a change to the time span or frame rate lands in both files instead of in whichever item you remembered to edit.
Render Queue or Media Encoder
Both routes produce an MP4; the choice is whether to encode inside After Effects or send the composition to Adobe Media Encoder.
- Render Queue. It stays inside After Effects. The H.264 encoder it uses is Media Encoder's interface and back end built into After Effects, and Adobe's overview notes that this embedded encoder lacks some of the full application's features. Frame rate, duration and resolution sit in the item's render settings, format and compression in its output module. Pick it when the comp is the only job and you can wait for the render.
- Adobe Media Encoder. A separate application with its own installation, queue and preferences, so the Render Queue route does not depend on it. Adobe gives two reasons to use it: you keep working in After Effects while it processes files, and it has presets the Render Queue does not.
A render item that is already set up can travel with the Queue in AME button in the Render Queue panel, but only part of it does. The render settings go, and so do the output file's name and folder. The output module's format and channels do not, so they are chosen again in Media Encoder, which also ignores file-name and location templates.
Export an MP4 from the Render Queue
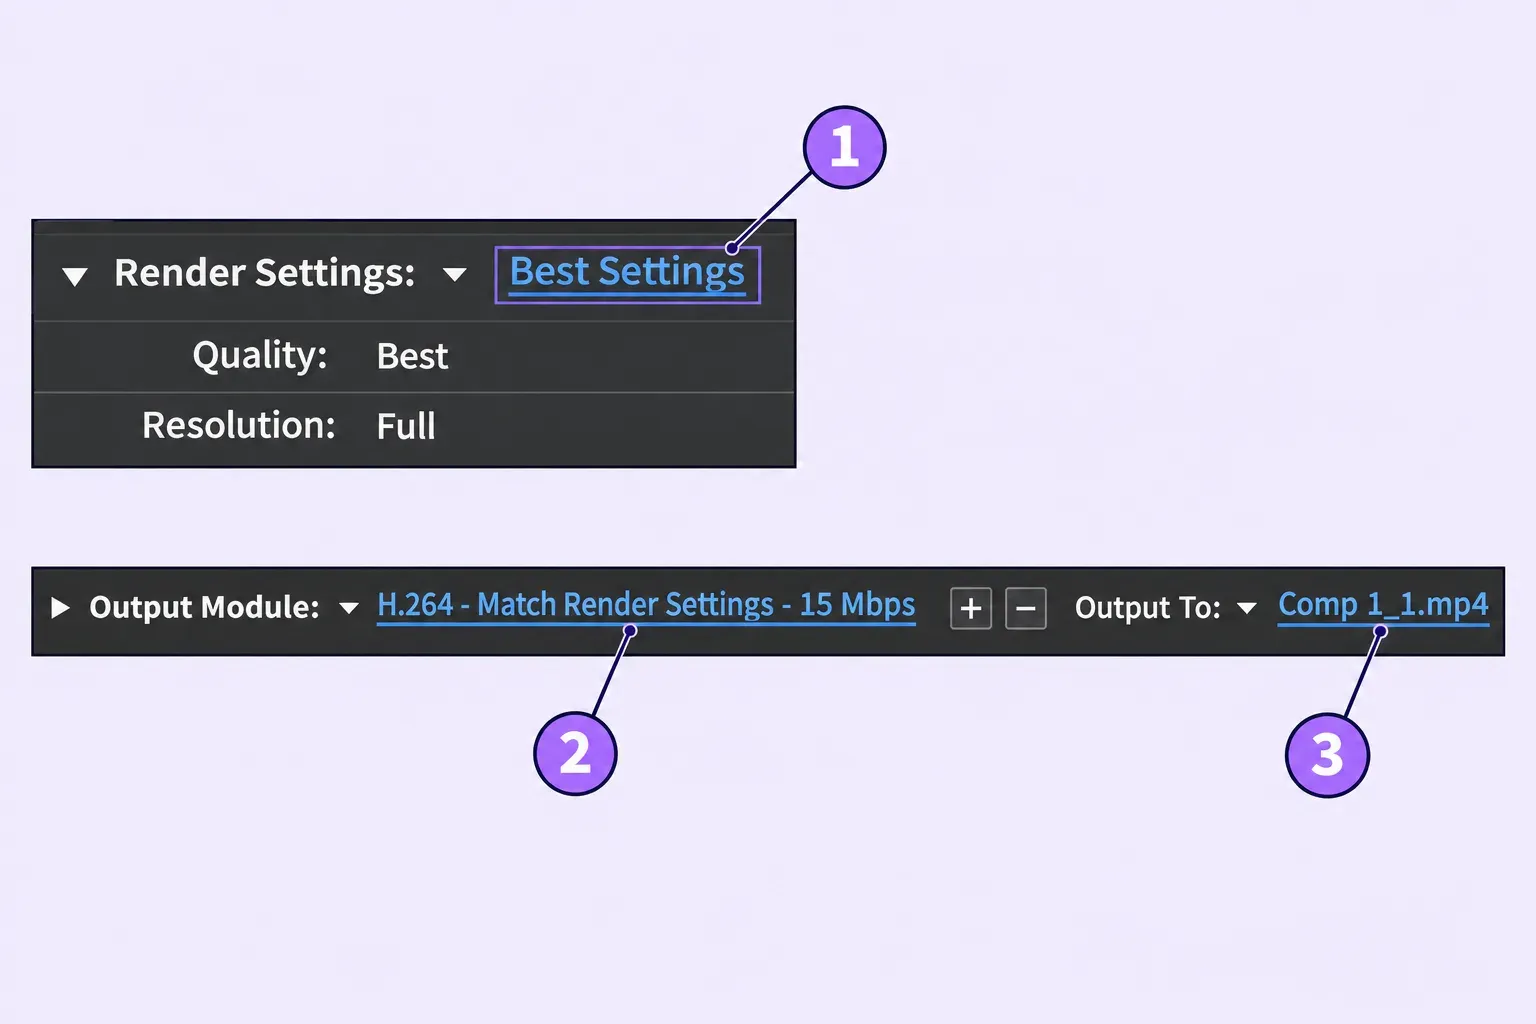

- Queue the comp. Select it in the Project panel and choose Composition > Add to Render Queue (Ctrl + M, or Command + M on macOS). File > Export > Add to Render Queue does the same, and so does dragging the comp into the Render Queue panel. A render item named after the comp appears in the panel with lines for Render Settings, Output Module and Output To.
- Set Render Settings to Best Settings. The triangle to the right of Render Settings lists its templates. Adobe describes Best Settings as the usual choice for final output and Draft Settings as a way to review motion. Clicking the underlined template name opens the settings themselves, where Time Span and Frame Rate live.
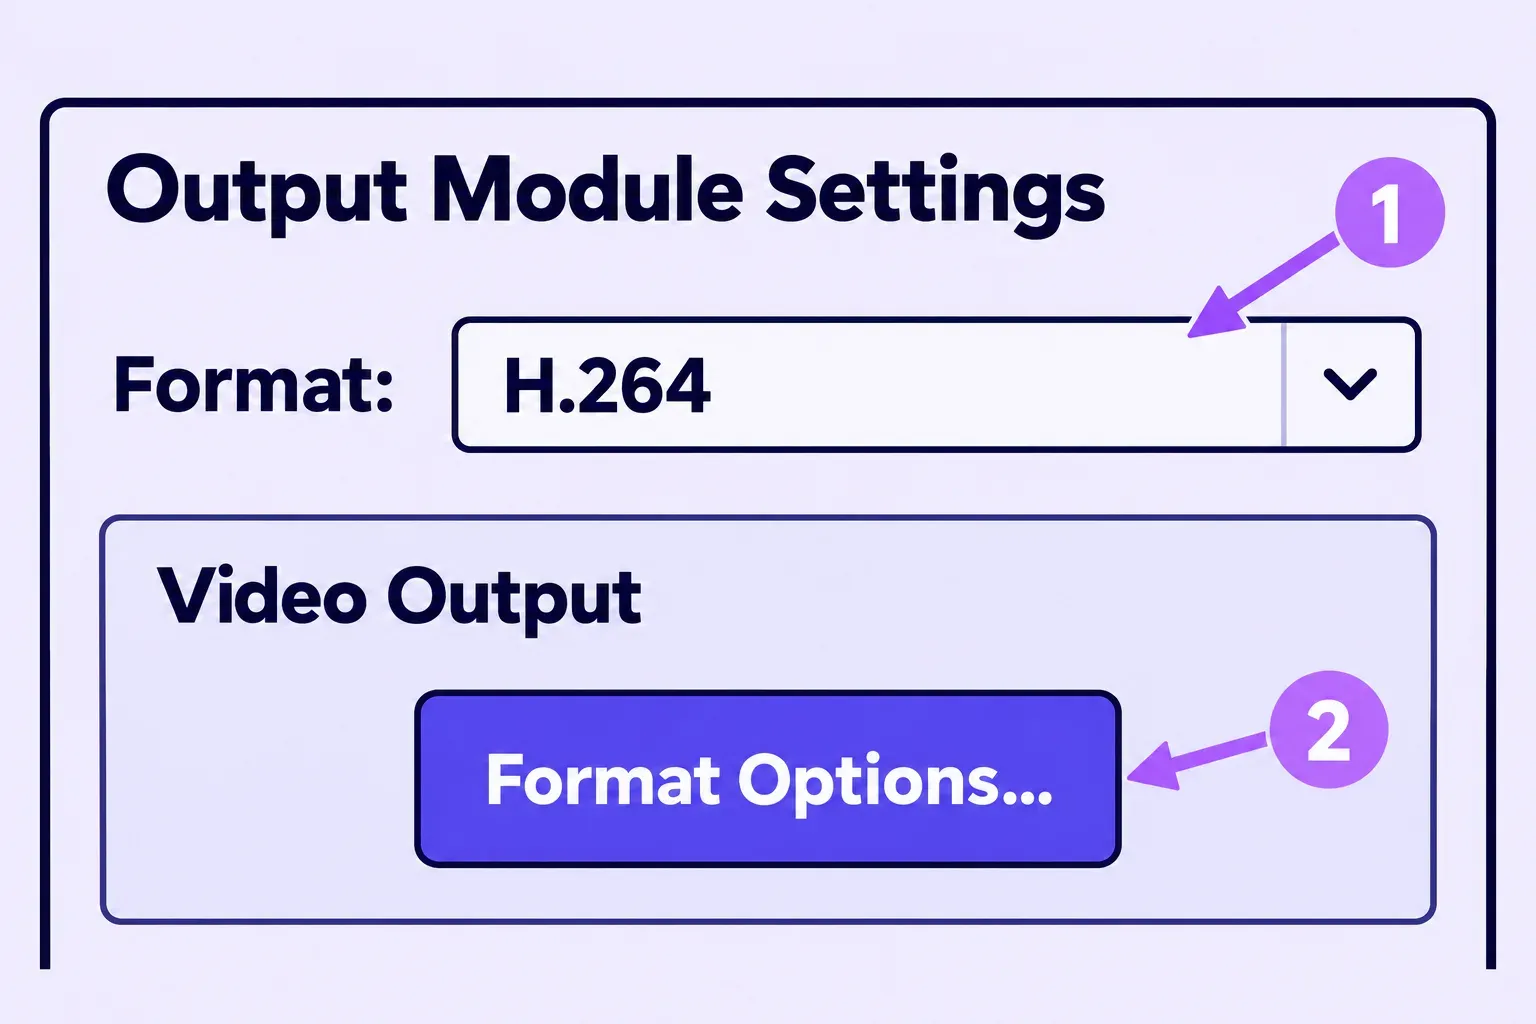
- Open the output module and choose H.264. Click the text next to Output Module to open Output Module Settings, then choose H.264 from the Format menu at the top. The menu now reads H.264. The shorter way is the triangle to the right of Output Module, which lists the output module templates, among them three H.264 presets at 5, 15 and 40 Mbps; picking one sets the format and a bitrate in one move. If H.264 is missing, use the Media Encoder route below.
- Check the video settings. In Video Output, open Format Options to adjust the H.264 Video, Audio and Multiplexer settings. Keep the composition's frame size unless the delivery needs another; leave Resize and Crop off when preserving that size.
- Check the sound. Make sure Audio Output includes audio when the comp has sound. Leave Audio Output off for a silent comp.
- Click OK, and read any warning before you accept it. When a render or output setting falls outside what H.264 supports, After Effects shows a dialog describing the adjustment it will make, and OK accepts that change. To choose the value yourself instead, go back through Output Module > Format Options to the H.264 options. A settings mismatch icon also appears in Output Module Settings and shows the details when you select it.
- Name the file and choose its folder. Click the text next to Output To, type a name and choose where the file goes; the triangle beside it offers names built from a naming convention instead. With all three lines set, the item's Render checkbox is selected and its status reads Queued.
- Render. The Render button at the upper right of the panel renders every Queued item in list order. If the render is simple, pressing Caps Lock beforehand stops the Composition panel from drawing each finished frame, which Adobe says saves processing time; turn it off again afterwards. How long the render takes depends on frame size, quality, complexity and compression.
- Check the file. When the item's status reads Done, open the folder chosen in Output To and play the file through once. Listen for sound, check the frame size and watch that the last frame is the one you meant.

Bitrate, frame size and frame rate for the MP4
After Effects ships three H.264 output module presets: 5, 15 and 40 Mbps, with Profile and Level set automatically from the output resolution. Choose the preset for the resolution and desired quality. Check the upload's size limit as well. On a fresh install, or after the Output Module preferences are cleared, the 15 Mbps preset called Match Render Settings is the default for the Movie Default and Save Current Preview Default templates. I'd start at 15 Mbps for an ordinary delivery, then inspect a short export containing the busiest motion and finest detail. Move up when compression damages those details and down when file size matters more; the receiving platform's specification takes priority over this starting point.
At full resolution with Crop off, the frame size stays the comp's unless you select Resize in the output module, where Lock Aspect Ratio To keeps the proportions. Frame rate starts in Render Settings: Use Comp's Frame Rate writes the comp's own rate, while Use This Frame Rate sets another without changing the comp. Adobe adds that the final encoded rate is decided by the output module settings, so a rate changed there wins. Keep the comp's rate unless the platform asks for a different one; Media Encoder's export settings reference warns that a frame rate different from the source can cause motion artifacts.
To start new render items from your preferred preset, hold Ctrl (Command on macOS) while choosing the template from the triangle menu beside Output Module in the Render Queue. For separate movie, preview and other defaults, open Edit > Templates > Output Module and choose the templates in the Defaults area. Editing a template does not change items already in the queue.
Export through Adobe Media Encoder
Media Encoder has to be installed, and Adobe's fix for exports that stall in it starts with matching its version to After Effects (the last section has the rest). The comp still has to be selected in After Effects first.
- Send the comp. Choose Composition > Add To Adobe Media Encoder Queue, or File > Export > Add to Adobe Media Encoder Queue, or press Ctrl + Alt + M (Command + Option + M on macOS). The comp shows up as an item in Media Encoder's queue.
- Choose the format and preset. Set Format to H.264. Match Source - High bit rate, the default Match Source preset for H.264, suits HD sources, and Match Source - Medium bit rate suits SD; three adaptive presets, Low, Medium and High, scale the bitrate with the source's resolution and frame rate.
- Choose where the file goes. Click the item's output path in the queue to pick the folder and file name.
- Open the full settings if a preset is not enough. Click the Format or Preset name in the queue to open the settings. The other routes are Edit > Export Settings and the item's right-click menu. Three settings matter most for an MP4: Multiplexer set to MP4 joins video and audio in one container, while None writes them as two separate files; Bitrate Encoding offers CBR or VBR in one or two passes, with a Target Bitrate and, for VBR, a Maximum Bitrate, both in Mbps; and the frame rate should match the source. Adobe describes VBR as adapting to how complex each frame is and CBR as a way to shorten export time at some cost to quality on complex frames. On the Audio tab, AAC is one of the formats on offer, and Adobe advises exporting at the sample rate the audio was recorded at, since a higher rate adds no quality.
- Start the queue. Click Start Queue; clicking it again pauses. After Effects is free for other work while Media Encoder runs. For H.264, Media Encoder's Performance setting defaults to Hardware Accelerated and drops to Software Only when the hardware is not supported, so a slower encode on another computer is not necessarily a fault.
- Find the file. When the item finishes, click its output file path, and the folder holding the file opens. Media Encoder's guide to encoding and exporting describes that link, and it is the quickest answer to an encode that seems to have vanished.
Render one precomp or only the work area
A precomp lives in the Project panel like any other composition and renders the same way. Select it there and add it to the Render Queue. To open it first, double-click it in the Project panel and queue it as the active comp. If the part you want is still a stack of layers inside the main comp, make it a precomp first.
The frame size of that file depends on how the precomp was made, according to Adobe's notes on precomposing and nesting. Pre-compose with Leave All Attributes In gives the new comp the selected layer's frame size; Move All Attributes Into The New Composition gives it the original comp's frame size. Leave All Attributes In is not available for several layers at once, nor for a text or shape layer. Before queueing, open the precomp and press Ctrl + K (Command + K) to see its size in Composition Settings, so a 1080-pixel delivery does not come out at the size of one logo. If the precomp has to keep its own frame rate when it is nested or rendered, Composition Settings > Advanced has Preserve Frame Rate When Nested Or In Render Queue.
A precomp that you want rendered once and then used as a finished file goes through Composition > Pre-render instead. It queues the comp with the post-render action Import & Replace Usage, so the rendered file comes back into the project where the precomp was used.
For a stretch of a longer comp, the work area does the job without new comps. Put the current-time indicator on the first frame you want and press B, then on the last and press N; Ctrl + Alt + B (Command + Option + B) fits the work area to the selected layers instead. In the render item's Render Settings, set Time Span to Work Area Only. Custom, in the same menu, takes a start and end you type in. The file you get back should start and stop exactly where the work area bar does.
Clear finished items from the Render Queue
A rendered item stays in the panel with the status Done until you remove it, and it cannot be rendered again. To remove one, select it and press Delete or choose Edit > Clear. Shift + Down Arrow and Shift + Up Arrow add the next or previous item to the selection, with the same keys on Windows and macOS. Look at the selection before you press Delete, because a Queued item goes just as quickly as a Done one.
- To render the same comp again, duplicate the Done item before clearing it. Ctrl + Shift + D (Command + Shift + D) duplicates the selected item with the same output file name, so rename it in Output To if both files should exist side by side. Select the Done item in the Render Queue panel before pressing the keys.
- To keep an item but skip it, clear its Render checkbox instead of deleting it. Its status changes to Unqueued and it stays in the list for later.
- To clear Media Encoder's queue, select one or more items and choose Remove from the right-click menu, choose Edit > Clear or press Delete. A Media Encoder preference also removes completed files from the queue when the application quits.
When the file comes out wrong or Media Encoder stalls
- The MP4 plays without sound. First confirm that the composition contains audible audio, then check Audio Output in the output module. If it was off, duplicate the Done item, enable audio in the copy and render again. In Media Encoder, also check Export Audio in Export Settings.
- Video and sound arrived as two files from Media Encoder. Its Multiplexer was set to None. Set it to MP4 in Export Settings and encode again.
- The frame rate or size differs from what you set. Either an H.264 mismatch warning was accepted with OK, which applies After Effects' adjustment, or the output module carries a frame rate of its own, which wins over Render Settings. Open Format Options again, set a value H.264 accepts, and check the mismatch icon in Output Module Settings before rendering.
- The file is the wrong length or the wrong size. Time Span decides the length, and for a precomp the way it was pre-composed decides the size; both are covered above.
If Media Encoder stalls near the start
Adobe's workaround for a stuck or extremely slow Media Encoder export starts with matching the After Effects and Media Encoder versions. Update both to compatible matching releases, then try these changes in Media Encoder:
- Open Preferences > General and turn off Enable Parallel Encoding.
- In that same General panel, find Video Rendering and set Renderer to Mercury Playback Engine Software Only. This is Media Encoder's renderer setting.
If the export still stalls, close both applications before resetting Media Encoder's preferences. Keep the existing folders as backups:
- macOS: in Finder, hold Option and choose Go > Library. In Preferences > Adobe, rename Adobe Media Encoder to Old_Adobe Media Encoder. Repeat that rename for the Adobe Media Encoder folder in Documents > Adobe.
- Windows: press Windows + R, enter
%appdata%and open Adobe. Rename Adobe Media Encoder to Old_Adobe Media Encoder. Repeat for the Adobe Media Encoder folder in Documents > Adobe.
Resetting preferences removes your current custom preferences from the active setup, so record settings you need before renaming the folders. Adobe's next step is a clean installation of Media Encoder if the earlier workarounds fail.