How to use the wiggle expression in After Effects
Add wiggle(2, 30) to Position, control the pace and distance, limit the shake to one axis, and drive it from sliders on a null.
On a layer without a Position expression, select the layer, press P and Alt-click (Windows) or Option-click (macOS) the Position stopwatch to add an expression, then replace the field with wiggle(2, 30). Click outside the field to apply it. The first number sets the pace in wiggles per second; the second sets roughly how far the property wanders, in pixels on Position. No new keyframes are required.
That is Adobe's basic wiggle example. I'd start on one visible 2D layer with combined Position and no existing expression, because both numbers are easy to judge against the frame. Existing Position keyframes can stay: wiggle adds motion around their path.
Set up the layer, the frame and the expression engine
Open the composition in the Timeline panel, select the layer and park the current-time indicator where the layer is visible. The steps below start with combined 2D Position and no expression already on it. If the property already has an expression, save a copy before replacing its text.
The expression can sit on a text or shape layer. It also works on a solid, a footage layer or a null.
An expression is JavaScript code attached to a property. Adobe explains that wiggle uses the pre-expression value: on a value of 0, wiggle(10, 10) varies around 0; on keyframed Position it adds secondary motion. A layer that slides across the frame on two keyframes keeps sliding and shakes on the way.
Check File > Project Settings > Expressions if pasted code produces an error. The Expressions Engine setting selects JavaScript or Legacy ExtendScript for the project. The conditional examples below use braces and an else branch, which Adobe's syntax comparison supports in both engines.
Add wiggle to Position, Scale, Rotation or Opacity
- With the layer selected, press P for Position, S for Scale, R for Rotation and Orientation, or T for Opacity. Adobe's keyboard shortcut reference lists those letters. The 2D Position example gives you one row with a stopwatch at its left; a 3D layer exposes additional components.
- On a property without an expression, Alt-click (Windows) or Option-click (macOS) that stopwatch in the Timeline panel, or in Effect Controls for an effect parameter. The menu route is to select the property and choose Animation > Add Expression; the click works on both operating systems. Expected result, per Adobe's page on editing expressions: the value turns red, and four icons appear under the property in this order: the Enable Expression switch, the Show Post-Expression Graph button, the pick whip (a spiral) and the Expression Language menu, with the expression field beside them.
- On Position the field opens with
transform.positionalready typed. Whatever it holds on your property, select all of it and typewiggle(2, 30)in its place. Adobe's expression language page treats wiggle(), position.wiggle() and thisProperty.wiggle() on that property as the same call, so the short form is enough. - Leave the field by clicking anywhere outside it, or by pressing Enter on the numeric keypad. On a Mac laptop with no keypad, the click is the route. Expected result: text-editing mode ends and the expression becomes active. The numbers stay red and no warning banner appears at the bottom of the Composition panel.
- Check it by dragging the current-time indicator several frames along: Position should vary as you move through time. Later, select the layers and press EE to show only the properties that carry expressions. To take the wiggle off, Alt-click or Option-click the same stopwatch again, or choose Animation > Remove Expression.
You can add an expression to any property that can be keyframed, but the result still has to fit that property's value type. Position, Scale, Rotation and Opacity are numeric starting points; a text or path property needs a different expression.
Read wiggle(2, 30) one argument at a time
The full signature in Adobe's wiggle() entry in the expression reference has five arguments, and only the first two are required:
wiggle(freq, amp, octaves = 1, amp_mult = .5, t = time)
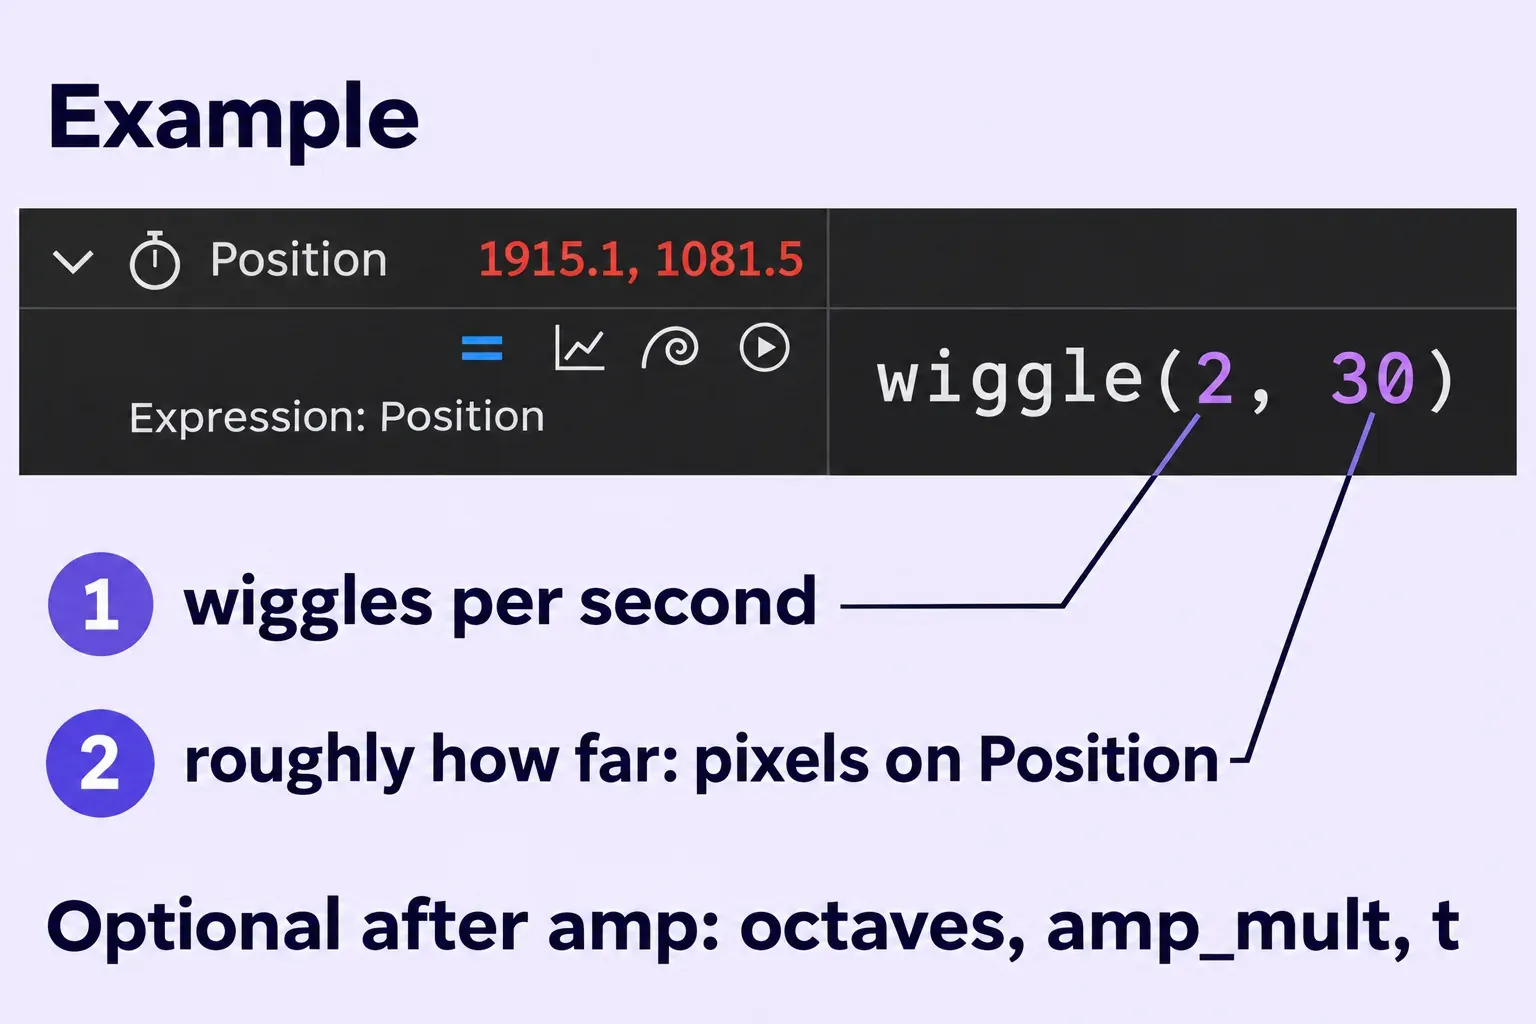
freq is the frequency in wiggles per second. Smaller values give a slower drift; larger values produce a busier shake. It is a pace for random motion, so wiggle(2, 30) does not promise a regular turn every half-second. The rate is expressed in seconds, independent of the composition's frame rate.
amp is measured in the units of the property the expression sits on, so the same 30 means different things on different rows. It sets how far, roughly, the value wanders from its own value; treat it as a size to judge by eye.
| Property | Values it holds | amp is counted in |
|---|---|---|
| Position | x and y; x, y and z on a 3D layer | pixels |
| 2D Scale | width and height | percentage points |
| 2D Rotation | one value | degrees |
| Opacity | one value | percentage points |
On 2D Scale, plain wiggle varies width and height independently, which can squash the layer. For a uniform pulse, start with static, equal Scale values such as 100%, 100%. Adobe's two-dimensional example takes the first wiggle value for both axes:
v = wiggle(5, 10);
[v[0], v[0]]
The result has identical x and y values; it does not preserve an unequal starting ratio. On Scale, an amplitude of 10 is a change of roughly 10 percentage points around the base. A 3D Scale property needs three components, so do not paste this two-value result onto it. Arrays count from 0: v[0] is width on Scale or x on Position, and v[1] is the second component.
Leave out value + wiggle(2, 30). Wiggle already starts from the property's own value, so adding value again counts the base twice and can move the layer far from where you placed it.
octaves adds finer layers of noise on top of the main wiggle (1 by default, which means only the main one). amp_mult is what amp is multiplied by for each added octave (0.5 by default; closer to 1 keeps the fine layers as large as the main one, closer to 0 adds less detail). t is the time the wiggle is sampled at, the current time unless you pass another, and the looping version further down depends on it. Adobe's own worked case is position.wiggle(5, 20, 3, .5): about 5 wiggles per second at about 20 pixels, plus two finer levels at 10 and 20 wiggles per second sized 10 and 5 pixels.
Check the curve in the Graph Editor
The value graph makes a slow wiggle easier to inspect. With the property selected, press Shift + F3 to open the Graph Editor, then enable Show Post-Expression Graph, the second expression icon. Adobe's editing instructions identify the dim graph as the pre-expression value and the bright graph as the result. On a static property the dim line is flat and the bright line varies around it. Increase freq for a busier curve or amp for a wider variation.
Show Post-Expression Graph works with value and speed graphs; choose the value graph to compare Position with its base. If Shift + F3 does nothing on a Mac keyboard, try holding Fn while pressing it so the keyboard sends F3 rather than a media command.
Starting values for drift, wander, shake and jitter
These are starting points from named sources, not fixed recipes. Adjust them while the selected layer and frame edges are visible.
| Look | Expression | Named by |
|---|---|---|
| Slow drift | wiggle(0.5, 10) | SpotlightFX |
| Gentle wander | wiggle(2, 30) | Adobe expression examples |
| Detailed, camera-style shake | position.wiggle(5, 20, 3, .5) | Adobe expression reference |
| Fast jitter | wiggle(10, 50) | SpotlightFX |
The drift and jitter pairs come from SpotlightFX's beginner guide to wiggle, which calls wiggle(0.5, 10) a "very slow, subtle drift" and wiggle(10, 50) "much faster, more jittery". The shake row is Adobe's worked case from the reference, where the extra octaves layer a finer tremor over the main shake. On Rotation the second number is degrees, and 30 degrees is a large tilt next to 30 pixels of travel, so start Rotation with a single digit and raise it by eye.
Shaking footage that exactly fills the frame can expose whatever lies underneath at the edges. Increase Scale enough to cover the largest excursion visible in the preview, then check the whole shot. Extra scaling crops the picture and can soften raster footage.
Wiggle only X or only Y
For a two-dimensional property, Adobe's wiggle() entry gives this expression, which wiggles the y-axis alone:
freq = 3;
amp = 50;
w = wiggle(freq, amp);
[value[0], w[1]]
The last line takes x from Position's own value and y from wiggle. For x only, end with [w[0], value[1]]. This is a two-dimensional result. On combined 3D Position, preserve the third component too: [w[0], value[1], value[2]] wiggles x alone, while [value[0], w[1], value[2]] wiggles y alone.
Separate Dimensions is the other route; choose it before adding wiggle. Adobe warns that separating Position loses some speed information from existing keyframes, while recombining loses some path and speed information. Save a layer or project copy first if Position already carries keys or an expression, and check the components after the change.
- Select Position and choose Animation > Separate Dimensions, or right-click (Windows) or Control-click (macOS) Position and choose Separate Dimensions. In the Graph Editor, the Separate Dimensions button at the bottom of the panel does the same. Expected result: X Position and Y Position rows, plus Z Position on a 3D layer.
- Alt-click or Option-click the stopwatch of X Position only and type
wiggle(2, 30). The 30 is now pixels on x alone, and Y Position keeps its value or its keyframes.
I'd keep Position whole and use the array version when the layer may get Position keyframes later, because the motion path stays one editable curve; Separate Dimensions earns its cost when x and y already need their own keyframes and eases.
Move both numbers onto sliders on one null
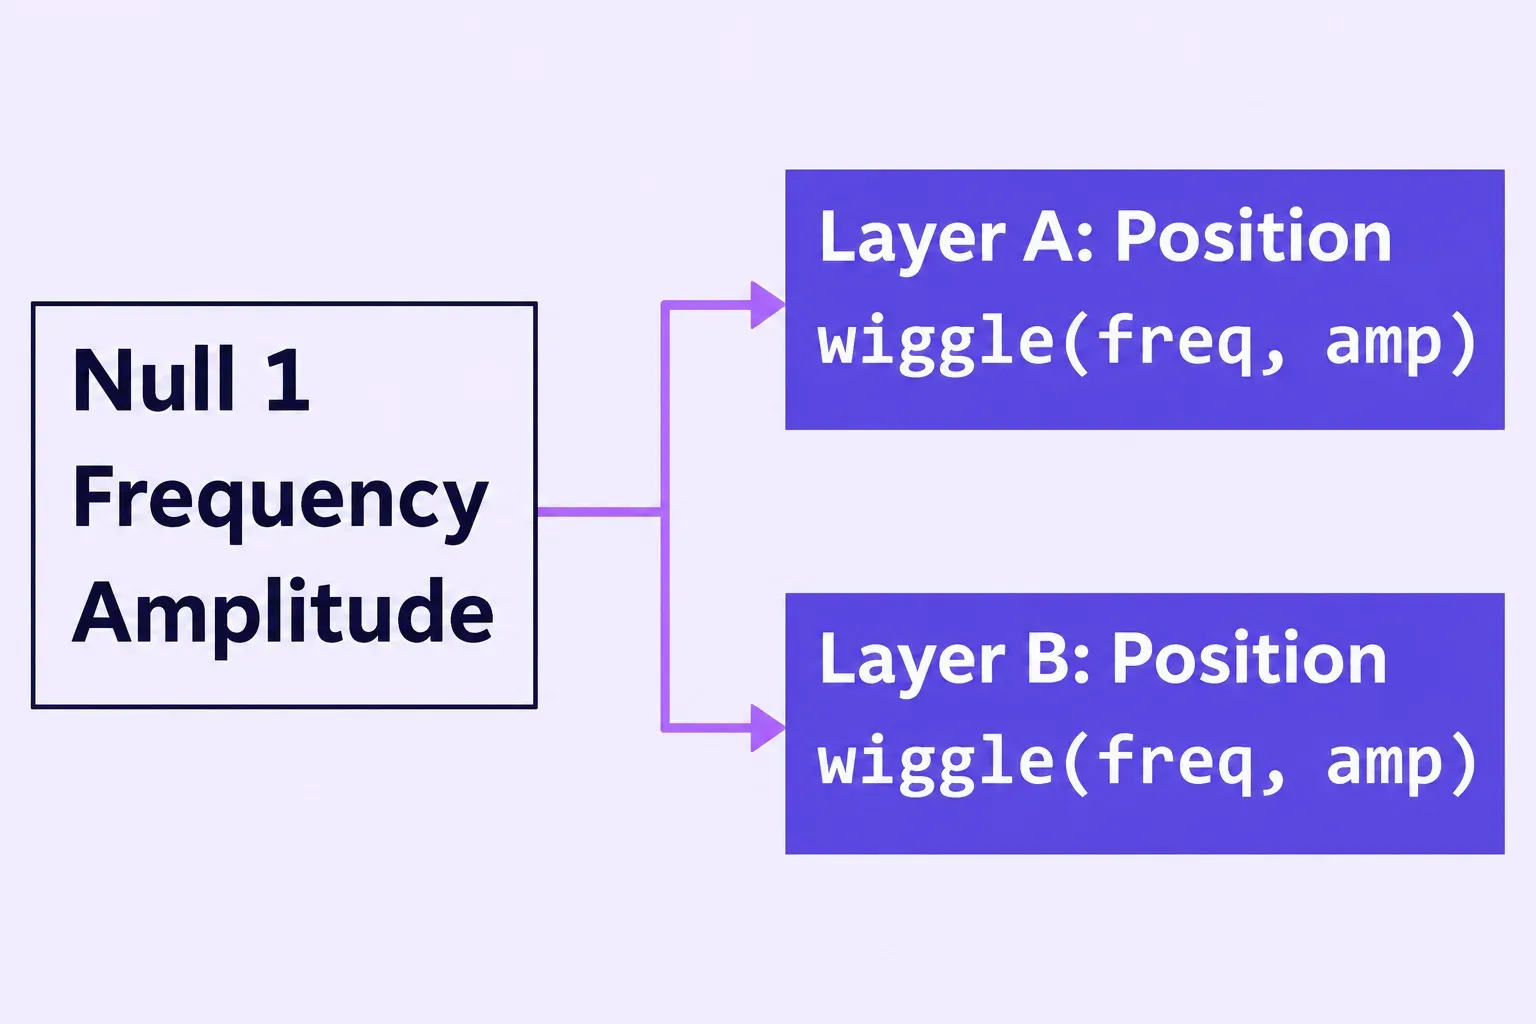
Typed numbers cannot be keyframed, and three layers wiggling with typed values mean three expressions to edit for every change. I'd move freq and amp onto Slider Controls on one null as soon as a second layer needs the same wiggle, so the next change is one value on the null rather than an edit inside every expression.
- Press Ctrl + Alt + Shift + Y (Windows) or Command + Option + Shift + Y (macOS) to add a null layer. Expected result: a new null layer in the Timeline panel; Adobe's own example expression calls it Null 1.
- In the Effects & Presets panel, open Expression Controls and drag Slider Control onto the null twice. Adobe's effect list files Slider Control under Expression Controls, and Adobe's page on expression controls applies them like any other effect and suggests a null as the controlling layer.
- Rename both before writing any expression: select the first Slider Control in the Timeline or Effect Controls panel, press Enter (Windows) or Return (macOS), type Frequency, and name the second one Amplitude. Renaming first matters because, as Adobe's troubleshooting page for expressions warns, an expression may stop working after a layer or effect it names is renamed. The same applies to a property group it names.
- Set Frequency to 2 and Amplitude to 30. If a slider stops short of the number you need, right-click (Windows) or Control-click (macOS) its underlined value and choose Edit Value to widen the range.
- Twirl open the null's Effects group in the Timeline panel until both Slider rows show, since the pick whip needs a visible target. On the wiggling layer, open its existing Position expression field and replace the text with the expression below, building each effect() part by dragging the pick whip onto the matching slider; the pick whip writes names as they appear in the Timeline panel.
freq = thisComp.layer("Null 1").effect("Frequency")("Slider");
amp = thisComp.layer("Null 1").effect("Amplitude")("Slider");
wiggle(freq, amp)
This extends Adobe's example, where one Wiggle Amount slider feeds wiggle(4, wiggleAmount), to two sliders on one null. Setting Amplitude to 0 removes the wiggle offset: a static property returns to its base value, while existing Position keyframes keep moving the layer. Paste the expression into another layer's Position to share both controls. If the null has a different name, use that name inside the quotes or build the link with the pick whip.
Start, stop or ramp the wiggle at a set time
The choice depends on how the wiggle should arrive. A keyed slider fades it in and out over frames you choose; an if/else switches it on or off at a fixed second.
For the ramp, use the Amplitude slider from the setup above. Set a keyframe at 0 on the frame where the shake should begin, 30 a few frames later, and back to 0 where it should end; Adobe's slider example notes that keyframing the slider starts and stops the wiggle at set times. Twelve frames from 0 to 30 at 24 fps is a half-second build, and fewer frames make it snap in. Expected result: in the Graph Editor the bright Position curve lies on the dim one before the first key and after the last.
Adobe's timed start example switches wiggle on after 2 seconds:
var timeToStart = 2;
if (time > timeToStart) {
  wiggle(3, 25);
} else {
  value;
}
At 2 seconds and earlier the property keeps its own value; the strict > comparison starts the wiggle only after 2 seconds. The stop version returns the plain value after 4 seconds:
var timeToStop = 4;
if (time > timeToStop) {
  value;
} else {
  wiggle(3, 25);
}
Adobe also gives a version limited to the interval between 2 and 4 seconds. Expression time is composition time in seconds. For a layer that starts later, time > inPoint + 1 instead switches on after one second has elapsed from its In point. A hard switch can jump if the wiggle offset is nonzero at that moment; use the Amplitude ramp when the shake needs to arrive gradually.
Stepped, calmer, reseeded and looping wiggles
For a stepped, jerky wiggle, put posterizeTime() first: posterizeTime(4); wiggle(2, 30) runs the wiggle at 4 frames per second, so in a 24 fps comp each position holds for 6 frames before the next jump. The reference describes posterizeTime(framesPerSecond) as running the rest of the expression at that rate, and the syntax differences page adds that posterizeTime(0) freezes the value at time 0, so keep the number above zero.
A wiggle that feels too busy is usually calmed by its first number before its second: halving freq slows the wander, while halving amp keeps the same nervous pace over a shorter distance. Leave octaves at 1 for a smooth line, because each added octave layers finer, faster noise on top.
To change a wiggle's pattern without changing its pace or size, put seedRandom() first, as in seedRandom(5); wiggle(2, 30). The reference says the offset, not the timeless argument, controls the starting value of wiggle, so passing true as the second argument does not freeze a wiggle. temporalWiggle() is a different method: it samples the property at a wiggled time instead of shaking its value, so it only does something on a property that is already animated.
A wiggle that loops
Plain wiggle does not automatically close at the end of a chosen loop. For a static, unkeyframed base, the Loop a Wiggle expression credited to Dan Ebberts blends two samples so the value meets at the cycle boundary. Keep frequency, amplitude and the seed unchanged throughout the cycle:
frequency = 2;
amplitude = 40;
secondsToLoop = 3;
t = time % secondsToLoop;
wiggle1 = wiggle(frequency, amplitude, 1, 0.5, t);
wiggle2 = wiggle(frequency, amplitude, 1, 0.5, t - secondsToLoop);
linear(t, 0, secondsToLoop, wiggle1, wiggle2)
secondsToLoop must be positive. Here it is 3 seconds, which gives 72 distinct frame samples at 24 fps: frame 0 through frame 71. t runs from 0 toward 3, then resets; one wiggle samples t, the other samples t - secondsToLoop, and linear() blends between them. With the static base and stable controls, the value approaching the end matches the start of the next cycle. The last exported frame is at 71/24 seconds, not at 3 seconds, so it need not equal the first frame. Do not duplicate an endpoint frame. Choose a loop duration containing a whole number of frames and export one full cycle; this recipe matches the value at the boundary without promising matching velocity.
Make text wiggle letter by letter
An expression on a text layer's Position moves the whole line as one block. For letters that each wander on their own, Adobe's text animation page uses a text animator with a Wiggly selector:
- With the text layer selected, open its Animate menu in the Timeline panel, or choose Animation > Animate Text, and pick Position. Expected result: an animator group with its own Position value and a default Range selector.
- For a simple full-text setup, select the default Range selector and press Delete. Set animator Position to a starting displacement, such as 0 on x and 20 on y. Max Amount and Min Amount in the Wiggly selector will scale that displacement.
- From the animator's Add menu choose Selector > Wiggly, or choose Animation > Add Text Selector > Wiggly. This simple setup now has one Wiggly selector.
- Adjust Wiggles/Second for the pace and Correlation for how much the letters move together: 100% moves them all at once, 0% lets each one go its own way. Max Amount and Min Amount, Temporal and Spatial Phase, Lock Dimensions and Random Seed shape the rest.
Move the current-time indicator through several frames. With a nonzero amount range and Correlation below 100%, characters should vary independently. To wiggle one word instead, keep a Range selector selecting that word, put the Wiggly selector below it and set Wiggly Mode to Intersect, as Adobe describes. An Expression selector offers per-character code, but Wiggly already handles this task without it.
Wiggle as keyframes: the Wiggler and Convert Expression To Keyframes
Some searches for a wiggle effect mean the Wiggler, which writes real keyframes instead of an expression. Adobe's section on the Wiggler lays out the route:
- Select a range of at least two keyframes on the property, then choose Window > Wiggler.
- Under Apply To, choose Spatial Path to add deviations to a spatial property's motion path, or Temporal Graph to change its velocity. A property that does not vary spatially offers only Temporal Graph.
- Pick Smooth Noise for gradual deviations or Jagged Noise for sudden changes. Choose one dimension (X, Y or Z), All Independently for a different set of deviations on each dimension, or All The Same for matching deviations.
- Set Frequency in deviations per second and Magnitude as the largest deviation in the property's own units. Select Apply, then preview the result. To reset the keyframes before adjusting the values, choose Edit > Undo Wiggler.
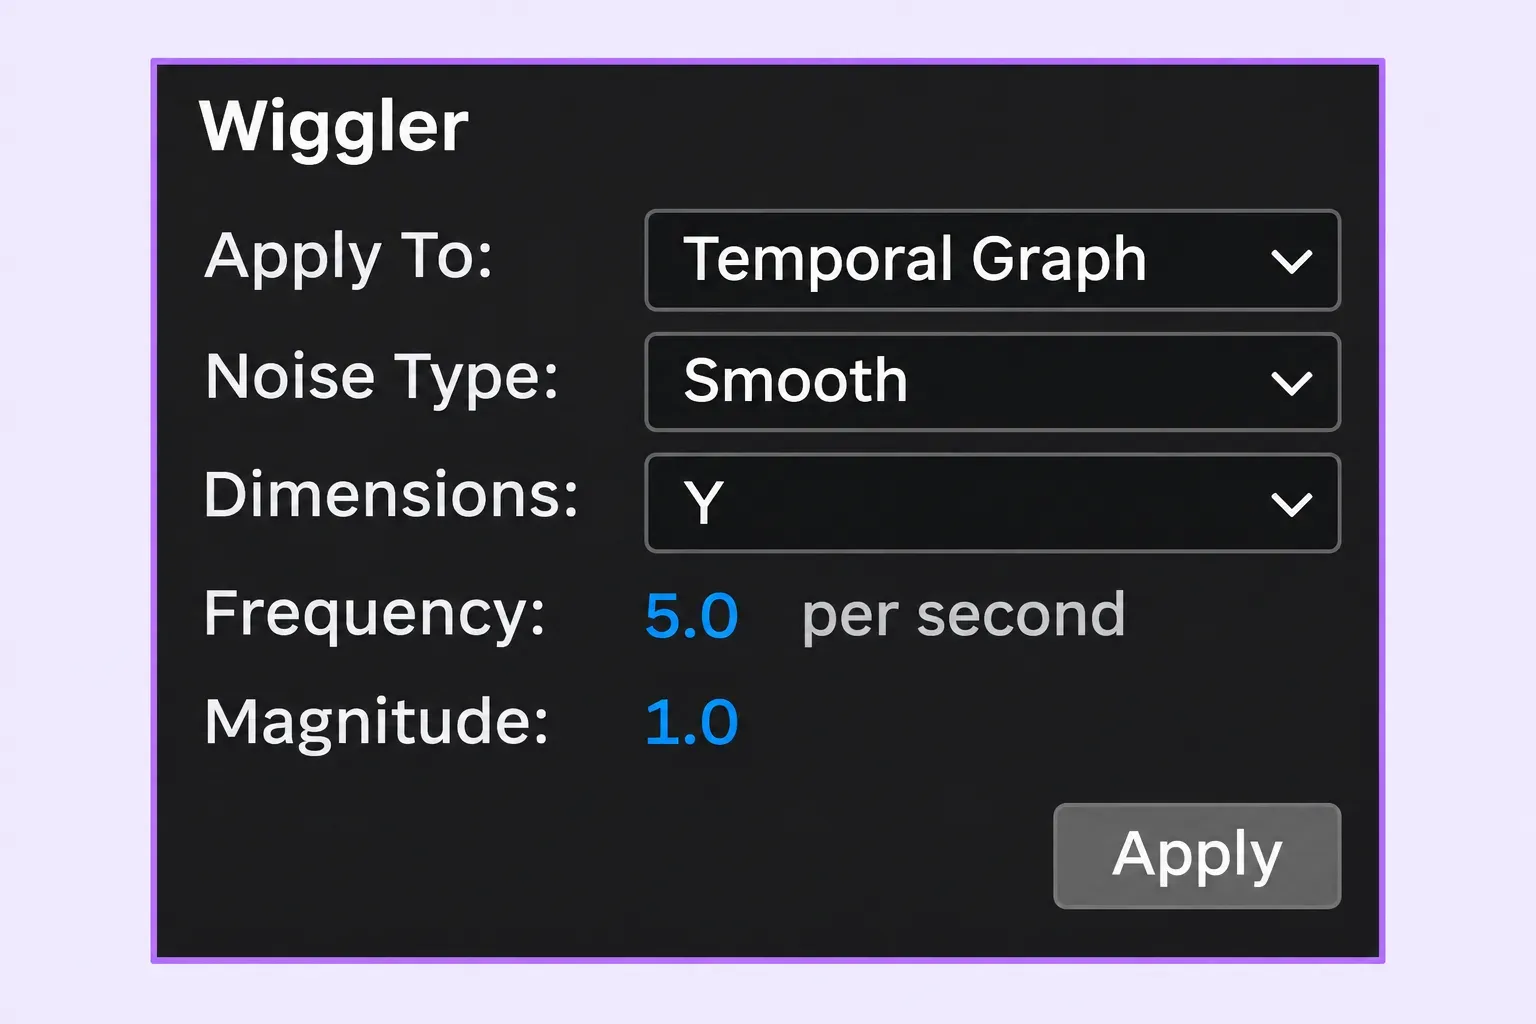
The panel adds random deviations across the selected range. Adobe itself calls the wiggle expression usually easier.
Save a project or layer copy before baking an expression, especially if the property already has keyframes. Select the property and choose Animation > Keyframe Assistant > Convert Expression To Keyframes. Convert Expression To Keyframes creates a keyframe on every frame and disables the retained expression. If the result is wrong, use Undo or return to the saved copy. Do not simply re-enable wiggle over its baked keys: that adds another wiggle offset to the baked motion. I'd keep the expression while timing or size may change, and bake only when individual frames need adjustment.
When the value turns into an error banner
A typo shows up at once. As Adobe's expression-error instructions explain, a warning banner appears at the bottom of the Composition and Layer panels while the expression keeps evaluating; its Reveal Expression button, a magnifying glass, jumps to the failing property, Reveal Expression Errors in the layer's context menu lists every failing expression, and one that cannot be processed is turned off and marked with a yellow warning icon.
Adobe's syntax comparison shows an expression ending in an if without else producing "Undefined value used in expression (could be an out of range array subscript?)". Its single-line if/else example without braces produces "Syntax Error: Unexpected token else". These messages can have other causes, so inspect the expression shown by Reveal Expression. For the timed snippets, use braces and an else branch, or the supported ternary form time > 2 ? wiggle(3, 25) : value. If a slider link fails after a rename, update the name inside the quotes or pick-whip the slider again.