After Effects keyboard shortcuts for the timeline, layers and preview
Windows and Mac shortcuts for preview, frame stepping, layer trims and Opacity keyframes, with the selection rules and panel conflicts that explain a key doing the wrong thing.

Use T to reveal Opacity, P for Position, and Spacebar to preview. To split a layer, select it, place the current-time indicator, then press Ctrl + Shift + D on Windows or Command + Shift + D on macOS. Alt + [ and Alt + ] trim the layer's In or Out point to that frame on Windows; use Option + [ and Option + ] on a Mac.
The two key sets map the same way almost everywhere: Ctrl on Windows becomes Command on a Mac, and Alt becomes Option. A handful of Mac keys use Control instead, for markers, audio-only preview and the Opacity nudge, and each one is written out where it comes up. The tables follow Adobe's default After Effects shortcuts. Keys are named as they sit on a U.S. English keyboard; other layouts are covered near the end.
Before pressing anything, put the comp in the state these keys expect: the composition open in the Timeline panel, the layer you mean to change selected, the current-time indicator parked on the frame where the change belongs, and the intended panel in focus. On a keyboard with Num Lock, turn it on for the keypad shortcuts marked with an asterisk in Adobe's reference. Some keys belong to one panel and do something else in another, so keep the Timeline panel in focus while you use the timeline keys.
Daily keys by task, Windows beside macOS
| Task | Windows | macOS |
|---|---|---|
| Start or stop a preview | Spacebar, or 0 on the numeric keypad | Spacebar, or 0 on the numeric keypad |
| Step 1 frame later or earlier | Page Down or Page Up, or Ctrl + Right or Left Arrow | Page Down or Page Up, or Command + Right or Left Arrow |
| Jump to the next or previous keyframe or marker | K or J | K or J |
| Trim the In or Out point to the current time | Alt + [ or Alt + ] | Option + [ or Option + ] |
| Split the selected layer at the current time | Ctrl + Shift + D | Command + Shift + D |
| Show only Opacity | T | T |
| Add or remove an Opacity keyframe at the current time | Alt + Shift + T | Option + T |
| Add a marker at the current time | * on the numeric keypad | * on the numeric keypad, or Control + 8 |
| Undo | Ctrl + Z | Command + Z |
| Redo | Ctrl + Shift + Z | Command + Shift + Z |
| Open the Keyboard Shortcuts editor | Ctrl + Alt + ' | Option + Command + ' |

Preview: where playback starts and where the indicator stops
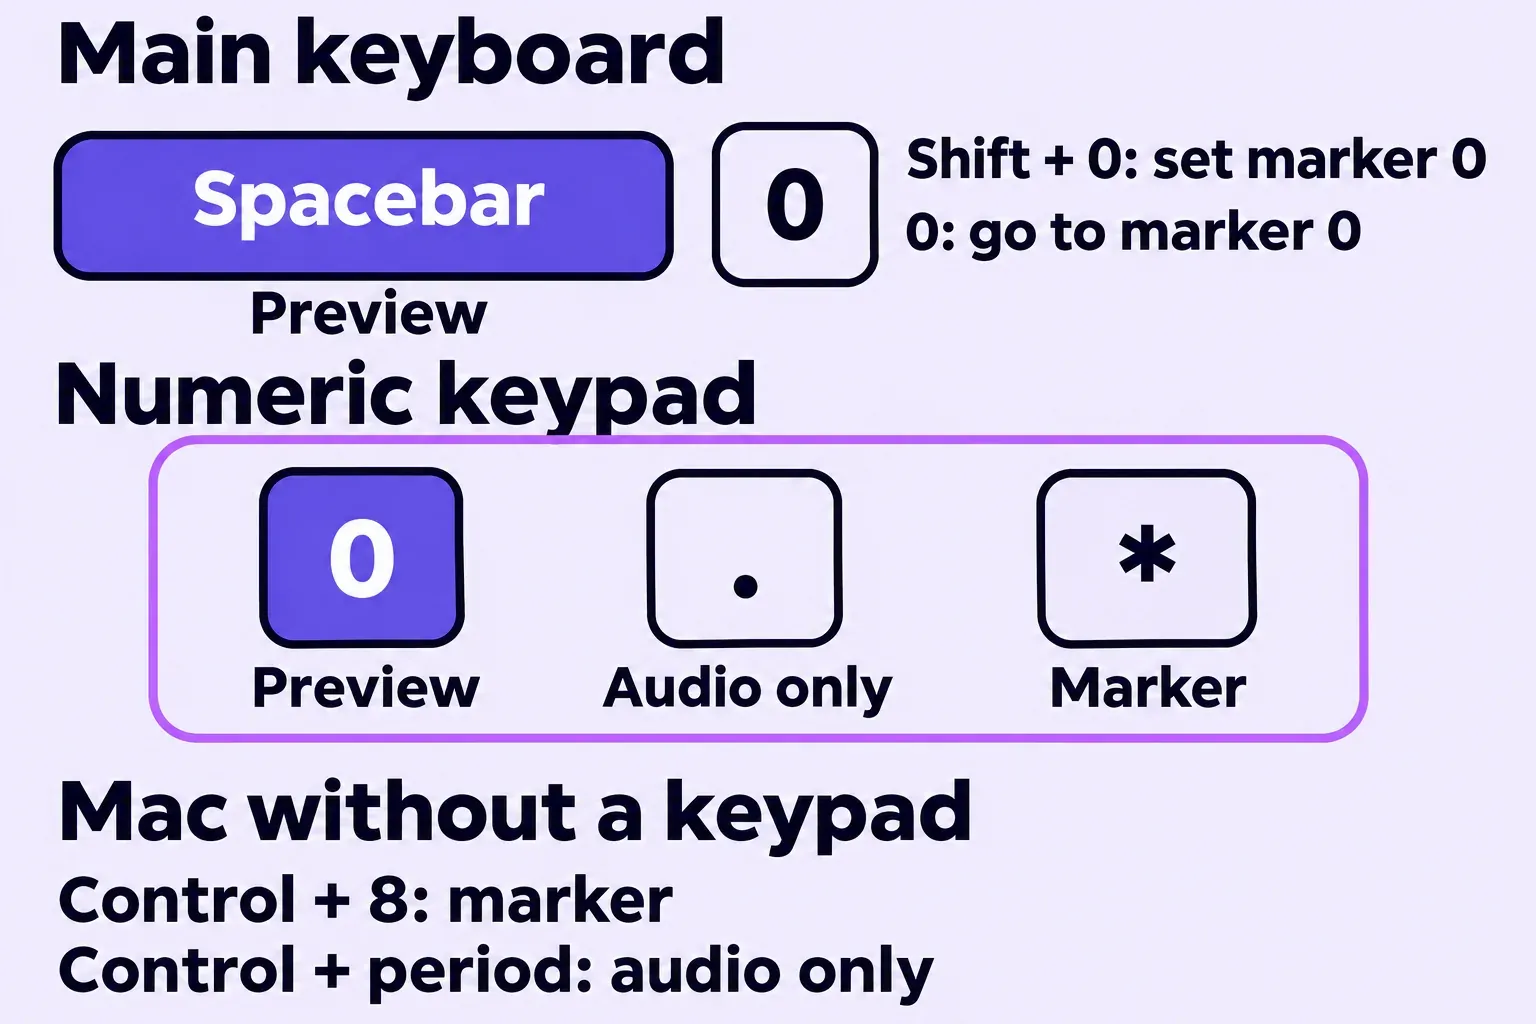
Five keys start and stop a preview on both systems: Spacebar, Shift + Spacebar, 0 on the numeric keypad, Shift + 0 on the keypad, and Alt + 0 on the keypad (Option + 0 on a Mac). They are not copies of one another, because each preview key keeps its own settings in the Preview panel. Choose a key from the panel's Shortcut menu, and the range, the start point and the stop behaviour shown under it belong to that key alone; the panel's Play button uses the settings of whichever key the menu shows.
Out of the box the keys differ in where the current-time indicator ends up:
- Spacebar previews the work area extended by the current time, starts at the current time, and when you press Spacebar again to stop, moves the indicator to the frame that was showing.
- Shift + Spacebar has Move time to preview time turned off, so the indicator stays on the frame it held before playback.
- 0 on the numeric keypad plays the work area from its first frame and also leaves the indicator where it was.
- Shift + keypad 0 plays the work area extended by the current time from the start of that range with Skip set to 1, so every other frame is drawn for a quicker pass, and leaves the indicator in place.
- Alt + keypad 0 (Option + keypad 0 on a Mac) plays a short stretch around the current time and leaves the indicator in place too.
If a second press stops caching but playback continues, check If caching, play cached frames for that key in the Preview panel. With it enabled, pressing the key before caching finishes stops caching and restarts the cached frames from the beginning of the range. Turn it off if that key should stop both caching and playback.
To see which behaviour you have, park the indicator on a frame, press Spacebar, let a second or two play and press Spacebar again: with the defaults the indicator now sits where playback stopped. Repeat with keypad 0 and the indicator is still on the frame you parked it on. Reset in the Preview panel puts the defaults back. Holding Alt (Option on a Mac) while you choose Reset gives behaviour close to After Effects CC 2014 and earlier instead, so hold the modifier only when that older behaviour is the one you want.
Audio only, and Mac keyboards without a keypad
The decimal point on the numeric keypad previews audio only, starting from the current time. On a Mac, Control + . (period) on the main keyboard does the same, which matters on laptop and compact keyboards that have no keypad. Spacebar previews need no keypad on either system, and the Keyboard Shortcuts editor described below can give a command whose default sits on the keypad a key on the main keyboard.
Move the current-time indicator by frames, keyframes and layer ends
These keys move the indicator and change nothing on the layer, so they are the ones to learn first:
- One frame. Page Down moves one frame later and Page Up one frame earlier; Ctrl + Right Arrow and Ctrl + Left Arrow (Command + Right Arrow and Command + Left Arrow on a Mac) do the same on keyboards without Page keys. Add Shift to any of them to move 10 frames, which is 0.4 seconds in a 25 fps comp and a third of a second at 30 fps.
- The next thing on the timeline. K jumps to the next visible item in the time ruler and J to the previous one: a keyframe, a layer marker, or the start or end of the work area. Adobe's word is visible, so reveal the property whose keyframes you want before stepping through them.
- Ends of the comp and the work area. Home and End go to the start and end of the composition, layer or footage item, as do Ctrl + Alt + Left Arrow and Ctrl + Alt + Right Arrow (Command + Option + Left Arrow and Command + Option + Right Arrow on a Mac). Shift + Home and Shift + End go to the start and end of the work area.
- The selected layer's ends. I goes to its In point and O to its Out point.
- An exact time. Alt + Shift + J (Option + Shift + J on a Mac) goes to a specific time, and D scrolls the Timeline panel back to the indicator when it has run out of view.
Trim, slide and split the selected layer at the indicator
Comp state for this section: one or more layers selected and the current-time indicator on the frame where the edit belongs. Every key below works from that frame.
Trim. Alt + [ trims the In point of the selected layers to the current time and Alt + ] trims the Out point; on a Mac they are Option + [ and Option + ]. Check the result on the layer bar: it now starts or ends exactly under the indicator.
Slide without trimming. [ and ] with no modifier move the selected layers so that the In point or the Out point sits at the current time. Nothing is cut off, so the bar keeps its length and only its place in time changes. Several shortcut lists call the bare brackets a trim; in Adobe's reference the trim is the Alt or Option version. Alt + Home moves the In point to the start of the composition and Alt + End moves the Out point to its end, with Option in place of Alt on a Mac.
Split. Two warnings come before the keys. With no layer selected, the split applies to every layer in the composition. And the same keys mean something else in another panel: in the Render Queue, Ctrl + Shift + D duplicates the render item with the same output filename. With the right layer selected and the Timeline panel in focus, press Ctrl + Shift + D (Command + Shift + D on a Mac), or choose Edit > Split Layer.
Then check the stack. Both layers of a split keep all of the original keyframes, and the new layer lands above or below the original according to Create Split Layers Above Original Layer in the Composition preferences: Edit > Preferences > Composition on Windows, After Effects > Settings > Composition on a Mac.
Offset several layers in one drag. Quick Offset moves selected layers apart in time without nudging each one: select the layers in the order you want them offset, hold Ctrl + Alt (Command + Option on a Mac) and drag, and an overlay reports the Total Offset and the offset Per Layer while you drag. The first selected layer stays in place, the last moves the full drag distance, and the layers between are evenly spaced. Keyframes travel with their layers, and the same drag works on selected keyframes. I prefer one Quick Offset drag for an evenly spaced stack because it keeps the gaps consistent without nudging each layer by hand.
Show only the property you are about to change
Select the layer first. Each of these keys acts on every selected layer and shows the corresponding properties in place of whatever was showing under it:
- P shows only Position.
- S shows only Scale.
- R shows Rotation and Orientation.
- T shows only Opacity, or Intensity on a light layer.
- A shows only Anchor Point, or Point Of Interest for lights and cameras.
Check: the selected layer shows the property rows named by the key, with their stopwatches and values.
Add a second property, or show only what is already animated
Shift plus a property key adds that property to the rows already open, or takes it away if it is open: T and then Shift + S leaves Opacity and Scale side by side. To hide a single row, Alt + Shift-click its name (Option + Shift-click on a Mac).
The remaining letter keys reveal particular properties or groups on the selected layer. For a double-letter shortcut, press the letter twice in quick succession.
- U shows the properties that have keyframes, and Adobe's layer properties page adds properties with expressions to that.
- UU shows modified properties.
- SS shows the properties and groups you have selected.
- E shows effects and EE shows expressions.
- MM shows masks.
Ctrl + ` (Command + ` on a Mac; ` is the accent grave key on a U.S. layout) opens or closes every property of the selected layers, and Ctrl-click (Command-click) on a group's triangle opens all the groups inside it. From the Effect Controls panel, double-clicking a property name reveals that same property in the Timeline panel.
Set a keyframe at the current time: the key that differs by system
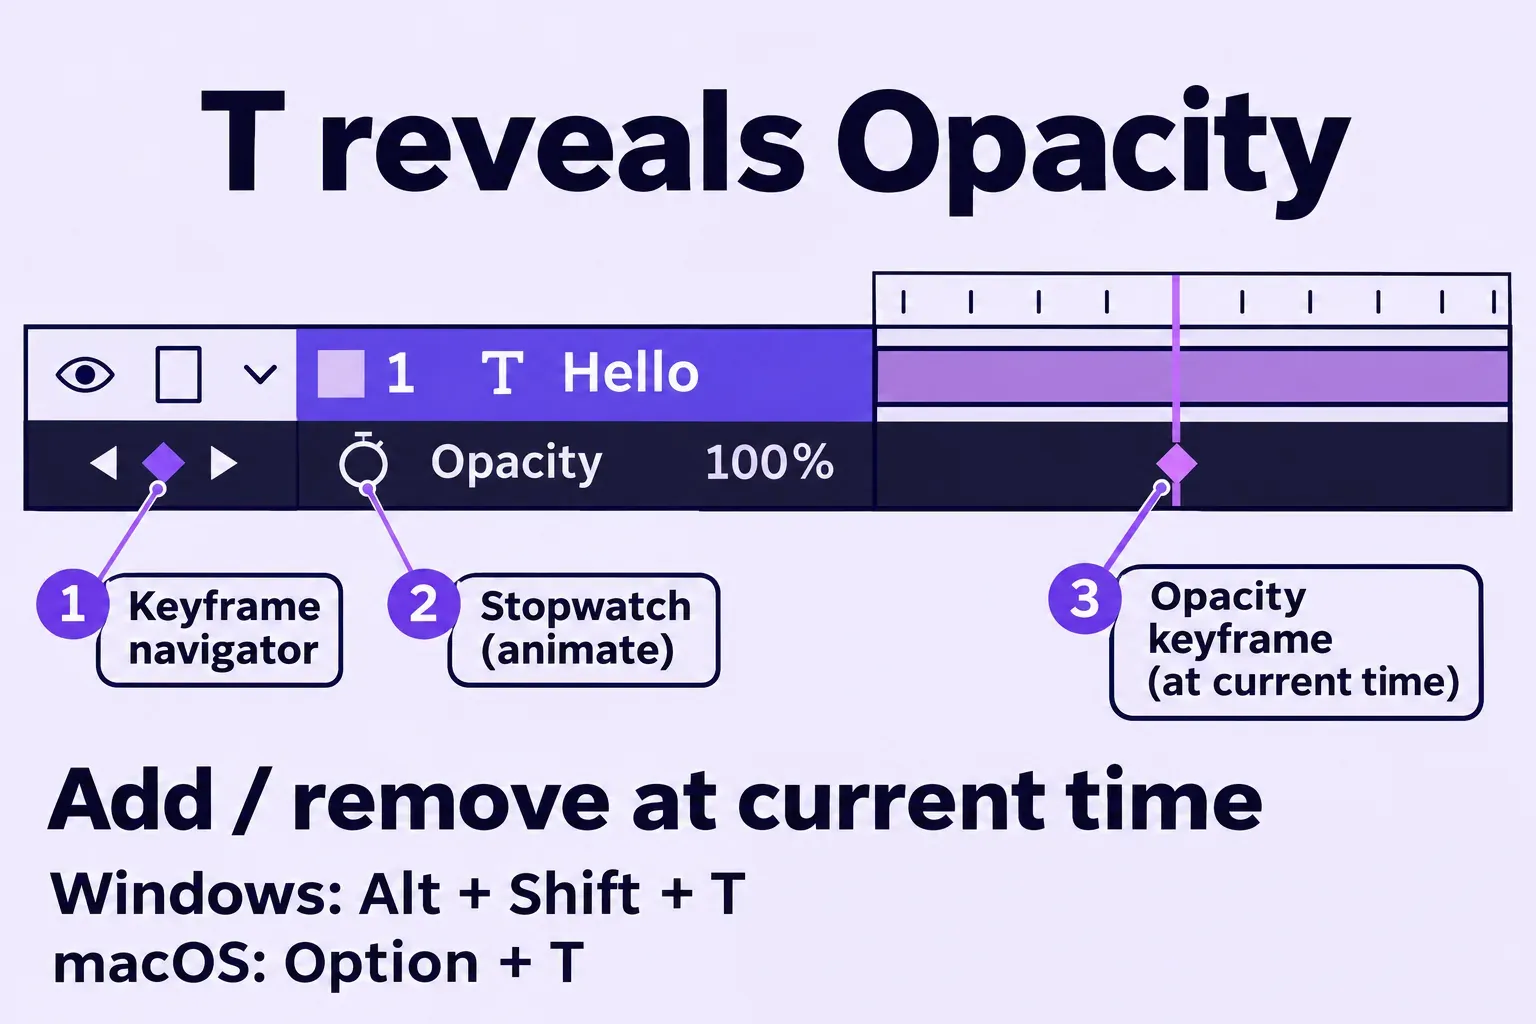
The keyframe shortcut drops Shift on a Mac as well as changing Alt to Option. On Windows, Alt + Shift + a property key adds or removes a keyframe for that property at the current time; on a Mac it is Option + the property key. For Opacity that is Alt + Shift + T or Option + T, and for Position Alt + Shift + P or Option + P. Adobe lists the command as add or remove, so pressing it again on a frame that already holds that keyframe takes the keyframe off.
Without the keys, the stopwatch next to the property name starts a property's first keyframe, and the menu command Animation > Add [property] Keyframe, with the property's name in the brackets, adds one at the current time.
Paired with the frame keys, the timing comes out exact. For this example, select a layer with no existing Opacity animation and make a fade from 0% to 100% over 10 frames:
- T opens only Opacity.
- I moves the indicator to the layer's In point.
- Alt + Shift + T (Option + T on a Mac) sets the first Opacity keyframe on that frame. Set its Opacity value to 0%.
- Shift + Page Down moves the indicator 10 frames later, 0.4 seconds at 25 fps.
- Set Opacity to 100%. With animation enabled, changing the value adds the second keyframe at the new time.
Check: two diamonds on the Opacity row, 10 frames apart, the second one under the indicator. Move between them to check that Opacity rises from 0% to 100%. Selected keyframes then move one frame at a time with Alt + Right Arrow or Alt + Left Arrow (Option + Right Arrow or Option + Left Arrow on a Mac).

Easing works on the same selected keyframes: F9 applies Easy Ease, Shift + F9 Easy Ease In and Ctrl + Shift + F9 (Command + Shift + F9 on a Mac) Easy Ease Out, and Shift + F3 toggles the Graph Editor so you can see what changed between the two frames. On a Mac the F keys may need Fn, as the last section explains.
Nudge Opacity, or any value, without the mouse
Ctrl + Alt + plus or minus on the numeric keypad raises or lowers the Opacity of the selected layers by 1%, and adding Shift makes it 10%. The Mac version uses Control, not Command: Control + Option + plus or minus on the keypad, again with Shift for 10%.
For any property, select its underlined value and the Up and Down Arrow keys change it by 1, by 10 with Shift and by 0.1 with Ctrl (Command on a Mac), as Adobe's page on layer properties describes.
Markers on the composition or on one layer
Where a marker lands depends on the selection at the moment you press the key. Adobe's page on layer and composition markers sets the rule: with no layer selected the marker key adds a composition marker, and with layers selected each selected layer gets a layer marker. Decide which you want before the key, not after.
- * on the numeric keypad adds a marker at the current time on both systems; on a Mac, Control + 8 on the main keyboard does the same. Either works during a preview, audio-only preview included, so markers can go in on the beat while the comp plays.
- Alt + * on the keypad (Option + * on a Mac, or Control + Option + 8) adds a marker and opens the marker dialog box for it.
- Shift + a number from 0 to 9 on the main keyboard sets a numbered composition marker at the current time, moving that number if it already exists, and the number key alone then jumps to it. These are the number-row keys; 0 on the keypad starts a preview instead.
To remove one marker, Ctrl-click it on Windows or Command-click on a Mac. A composition marker can also be dragged to the Comp Marker Bin. To clear layer markers, select only the intended layer or layers, right-click one of their markers and choose Delete All Markers. This removes the markers from the selected layers.
Undo, redo and the History list
Ctrl + Z undoes and Ctrl + Shift + Z redoes, Command + Z and Command + Shift + Z on a Mac. After Effects can undo up to 99 of the most recent changes, and only changes to project data count: scrolling the Timeline panel or picking a tool is not an undo step, so Ctrl + Z after a scroll takes back the last edit, not the scroll.
To go back further than a few presses, Edit > History lists earlier states; choosing one undoes that change and every change after it. File > Revert discards unsaved changes and cannot be undone; use the History list when you want to reverse edits within the current session.
Work area and Timeline zoom
The work area is the stretch keypad 0 previews by default, so its keys pair with the preview keys. B sets the start of the work area at the current time and N sets its end, and Ctrl + Alt + B (Command + Option + B on a Mac) fits the work area to the selected layers. Ctrl + Shift + X (Command + Shift + X) trims the composition to the work area, which changes the comp's duration, so check the work area before pressing it; Ctrl + Z takes it back like any other project change.
For the Timeline zoom, = zooms in and - (hyphen) zooms out, both on the main keyboard rather than the keypad. ; (semicolon) zooms in to single frames, and pressing it again shows the whole composition.
Footage and layer keys people look up by name
Ctrl + E is Edit Original: it opens the selected footage item in the application associated with it, for changes made outside After Effects.
| Command | Windows | macOS |
|---|---|---|
| Edit Original (selected footage item) | Ctrl + E | Command + E |
| New solid | Ctrl + Y | Command + Y |
| New adjustment layer | Ctrl + Alt + Y | Command + Option + Y |
| New null object | Ctrl + Alt + Shift + Y | Command + Option + Shift + Y |
| Precompose the selected layers | Ctrl + Shift + C | Command + Shift + C |
Look up or change a key in the Keyboard Shortcuts editor
Open the Keyboard Shortcuts editor with Ctrl + Alt + ' on Windows or Option + Command + ' on a Mac. Here ' means the apostrophe key on a U.S. layout. The editor has three parts: a keyboard layout, a Command list and a Key modifier list.
Read the colours, then switch to a panel's keys
On the keyboard layout, a key shaded gray has no shortcut in the selected view, a purple key has an application-wide shortcut, and a green key has a shortcut that works in one panel only. The editor opens on the application shortcuts; the Command drop-down switches the view to the keys of a single panel. When a panel shortcut uses the same keys as an application shortcut, the panel one wins while that panel has focus, which is how Ctrl + Shift + D can split a layer in one place and duplicate a render item in the Render Queue.
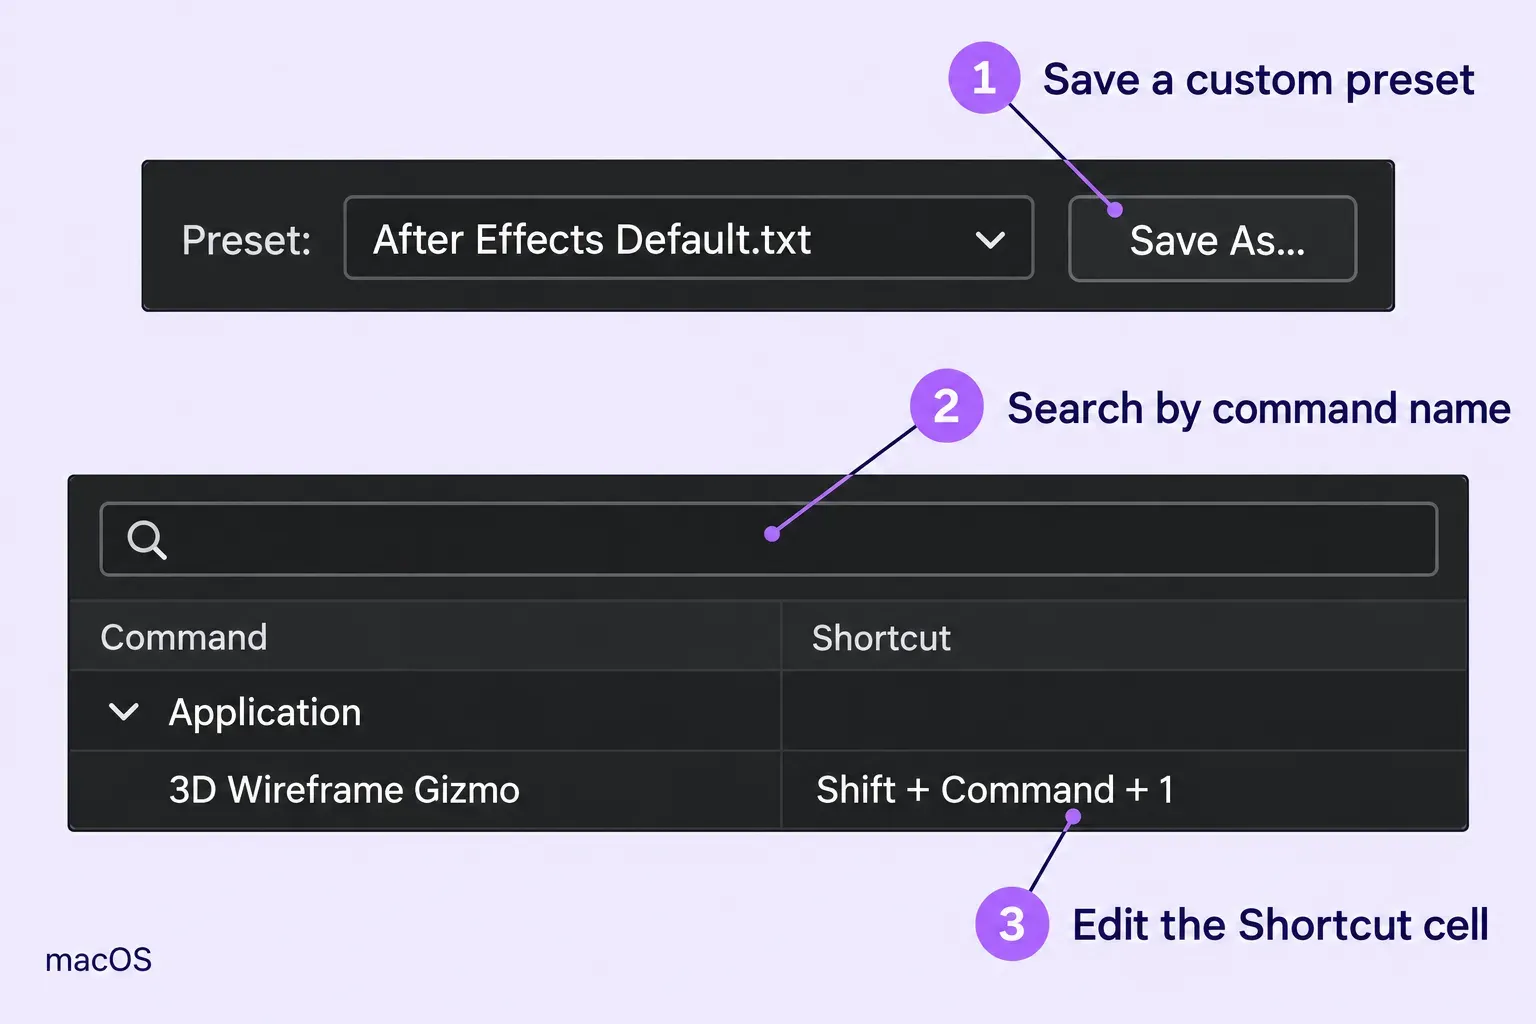
To look up a key, search the Command list for the command's name, Split Layer for example, and read the keys in its shortcut column.

Assign a key, settle a conflict, keep a set of your own
Two limits come first. Adobe's list of keys that cannot be reassigned covers twenty letter shortcuts: A, AA, E, EE, F, FF, L, LL, M, MM, P, PP, R, RR, S, SS, T, TT, U and UU. And the shortcut set is stored with your After Effects preferences: on Windows in AppData\Roaming\Adobe\After Effects\[version] inside your user folder, on a Mac in Library/Preferences/Adobe/After Effects/[version] inside your home folder, and the Reveal Preferences button in the Startup & Repair preferences shows that folder in Explorer or Finder. Adobe recommends not editing these files by hand. Adobe traces error 21::31 at the next start to a shortcuts file edited in TextEdit with Smart Quotes on. Everything that can be changed is safer to change in the editor.
- Press Save As and name a set of your own before the first change. I'd do this every time, because the new keys then live under your name and the After Effects Default preset, which the editor shows by default, stays as Adobe ships it.
- Find the command in the Command list, searching by name, select it and type the new keys in its shortcut column. Dragging the command onto a key in the keyboard layout or the Key modifier list does the same.
- If the keys are taken, a warning appears at the bottom of the editor, the conflicting command is highlighted in blue, and the Undo and Clear buttons at the lower right become available. Before keeping the new keys, decide whether the highlighted command can do without them; check both the application view and the relevant panel view before reusing a gray key. The panel assignment can take priority when that panel has focus.
- Check: the command now shows the new keys in its shortcut column, and the key on the layout carries purple for an application shortcut or green for a panel one.
When a shortcut does nothing
Check the active panel and shortcut set first, then the physical key. A missing keypad or an F key assigned to macOS needs a different fix from a changed command.
Numeric keypad keys. On a keyboard with Num Lock, turn it on for the starred keypad shortcuts in Adobe's reference. Distinguish keypad 0, decimal, asterisk and plus/minus from similarly named main-keyboard keys. A Mac keyboard without a keypad has Control + 8 for markers and Control + period for audio preview, and the editor can move other keypad commands to main-keyboard keys.
F keys on a Mac. Adobe notes that shortcuts on F9 to F12 may conflict with macOS shortcuts, and F9 is Easy Ease. Apple's guide to the function keys on a Mac gives two ways to send a true F key: hold Fn or Globe while pressing it, or turn on Use F1, F2, etc. keys as standard function keys in System Settings > Keyboard > Keyboard Shortcuts > Function Keys on macOS Ventura or later.
Command + H, Command + M and other system keys. The Mac Composition preferences carry Use System Shortcut Keys, a setting the Preferences page lists for macOS only. With it on, macOS shortcuts such as Command + H to hide and Command + M to minimize take those keys instead of After Effects, and the Control key reaches the other set. Adobe's pages name only these keys and the F9 to F12 range, so for any other key that does nothing, look it up both in the editor and under System Settings > Keyboard > Keyboard Shortcuts to see whether macOS has claimed it.
Keyboards other than U.S. English. Keys such as `, ', =, ;, [ and ] are named here by their place on a U.S. layout, and Adobe's reference gives no mapping for other layouts. When After Effects does not support the attached keyboard, the editor shows the U.S. English layout instead. Search the command by name in the editor rather than hunting for the key, and if its key is awkward or missing on your layout, give the command one you can reach.
The wrong panel in focus. A panel key acts only while its panel has focus, and it beats an application shortcut on the same keys. Click into the Timeline panel and press the key again.
A changed set. On a shared or inherited setup the active set may not be After Effects Default, so open the editor and check which set is shown before treating a key as broken.
Resetting everything. Back up first: Adobe keeps the preferences, keyboard shortcuts and workspaces included, as files in the [version] folder, so open it with Reveal Preferences in Startup & Repair and copy it somewhere safe. Holding Ctrl + Alt + Shift (Command + Option + Shift on a Mac) while After Effects starts restores the default preferences, and any custom setting kept in them goes too. Adobe's pages do not say whether that includes a custom shortcut set, so keep it as a last step after checking the active shortcut set and OS conflicts.
Once the keys match your keyboard, save the custom set and return to the selected layer. Use T or P to expose the value you need, then place the indicator before the next edit.