How to make transitions in After Effects with built-in effects and presets
Overlap the outgoing shot above the incoming one, then animate Opacity or Linear Wipe. Build slides and zooms, inspect presets, and check a transition pack's dependencies.

To make a transition in After Effects, overlap two layers with outgoing shot A above incoming shot B. Animate A's Opacity from 100% to 0% for a fade, or apply Linear Wipe and animate Transition Completion from 0% to 100% across the overlap. Position and Scale make slides and zooms; built-in animation presets save you from rebuilding a designed move at each cut.
I'd build a simple fade or wipe with the included tools because the whole change stays in one property on shot A. Download a pack when you want its specific look: check the item's licence, file type, After Effects version and plug-in requirements before using it.
Two overlapping layers before the first keyframe
The fade, wipe and individual-layer slide builds start with this state in the Timeline panel. The later adjustment-layer zoom uses a plain cut instead:
- The composition holding both shots is open, with shot A (the one leaving) one row above shot B (the one arriving). The upper layer is drawn over the lower one, so A hides B wherever both have frames.
- The two layer bars overlap: A's Out point falls later than B's In point. Use the first and last shared frames as the endpoints of the manual animation, and judge its duration at your composition's frame rate.
- Both clips have frames to spare around the join. Trimming hides footage frames rather than deleting them, so a trimmed clip can be dragged back out, but only as far as its footage reaches; Adobe's list of layers that extend past their original length names stills, shapes, text and time-remapped layers, and ordinary footage clips are not on it.
To make the overlap, put the current-time indicator on the frame where the transition should begin, select shot B and press [ to move its In point to that frame. If shot A stops too early to reach past it, stand the indicator where A should end, select A and press Alt + ] on Windows or Option + ] on macOS, which trims or extends the Out point to the current time. Alt + Page Up or Alt + Page Down (Option + Page Up or Option + Page Down on a Mac) then nudges the selected layer one frame earlier or later, and with Shift added it moves 10 frames, per Adobe's keyboard shortcut list for After Effects.
Check the overlap before any effect goes on. Select shot B and press I: the indicator jumps to B's In point, the first shared frame. Select shot A and press O: it jumps to A's Out point, the last displayed frame of A. Adobe's layer timing instructions distinguish that displayed frame from the frame after the layer ends.
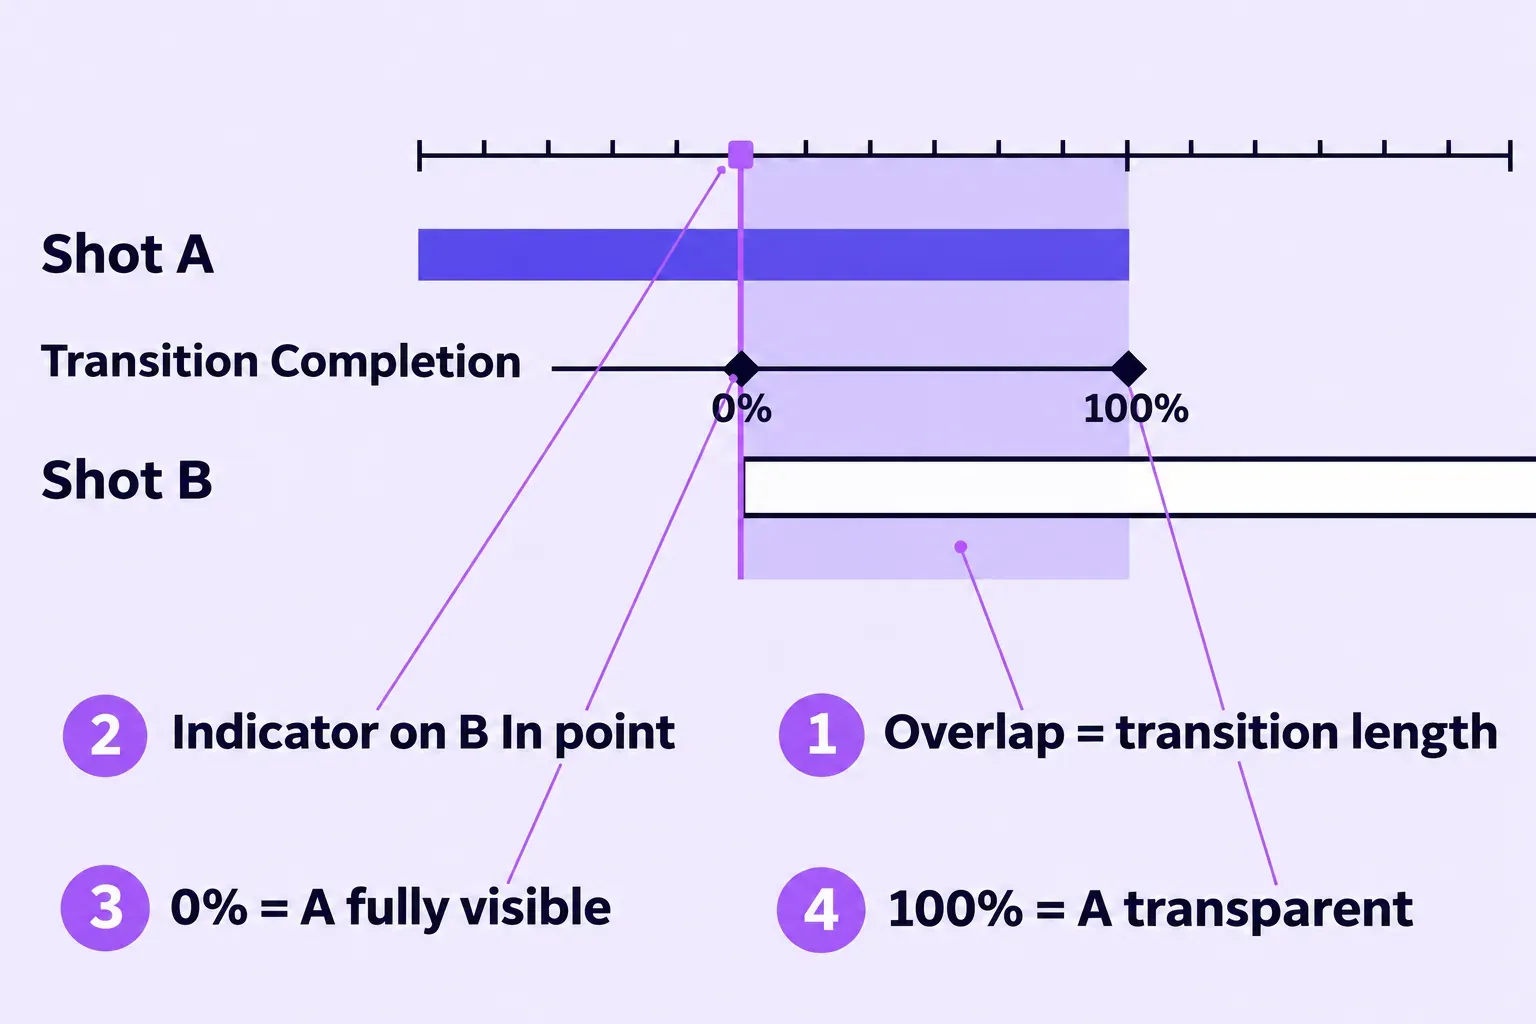
Which layer carries the transition
Linear Wipe, Radial Wipe and Gradient Wipe use a Transition Completion property: at 100%, the layer carrying the effect is transparent and the layers underneath show through. Animate 0% to 100% on A, the upper outgoing layer. With B above A instead, reverse those endpoints on B so it appears. Card Wipe shows a selected Back Layer on the backs of its cards. Iris Wipe uses radii rather than this percentage, as described below.
An effect remains applied for the duration of its layer; its animated properties control when the visible change happens. In the simple two-key fade, wipe and slide builds, the property holds the first value before the first key and the last value after the second. That keeps the hand-off within the overlap.
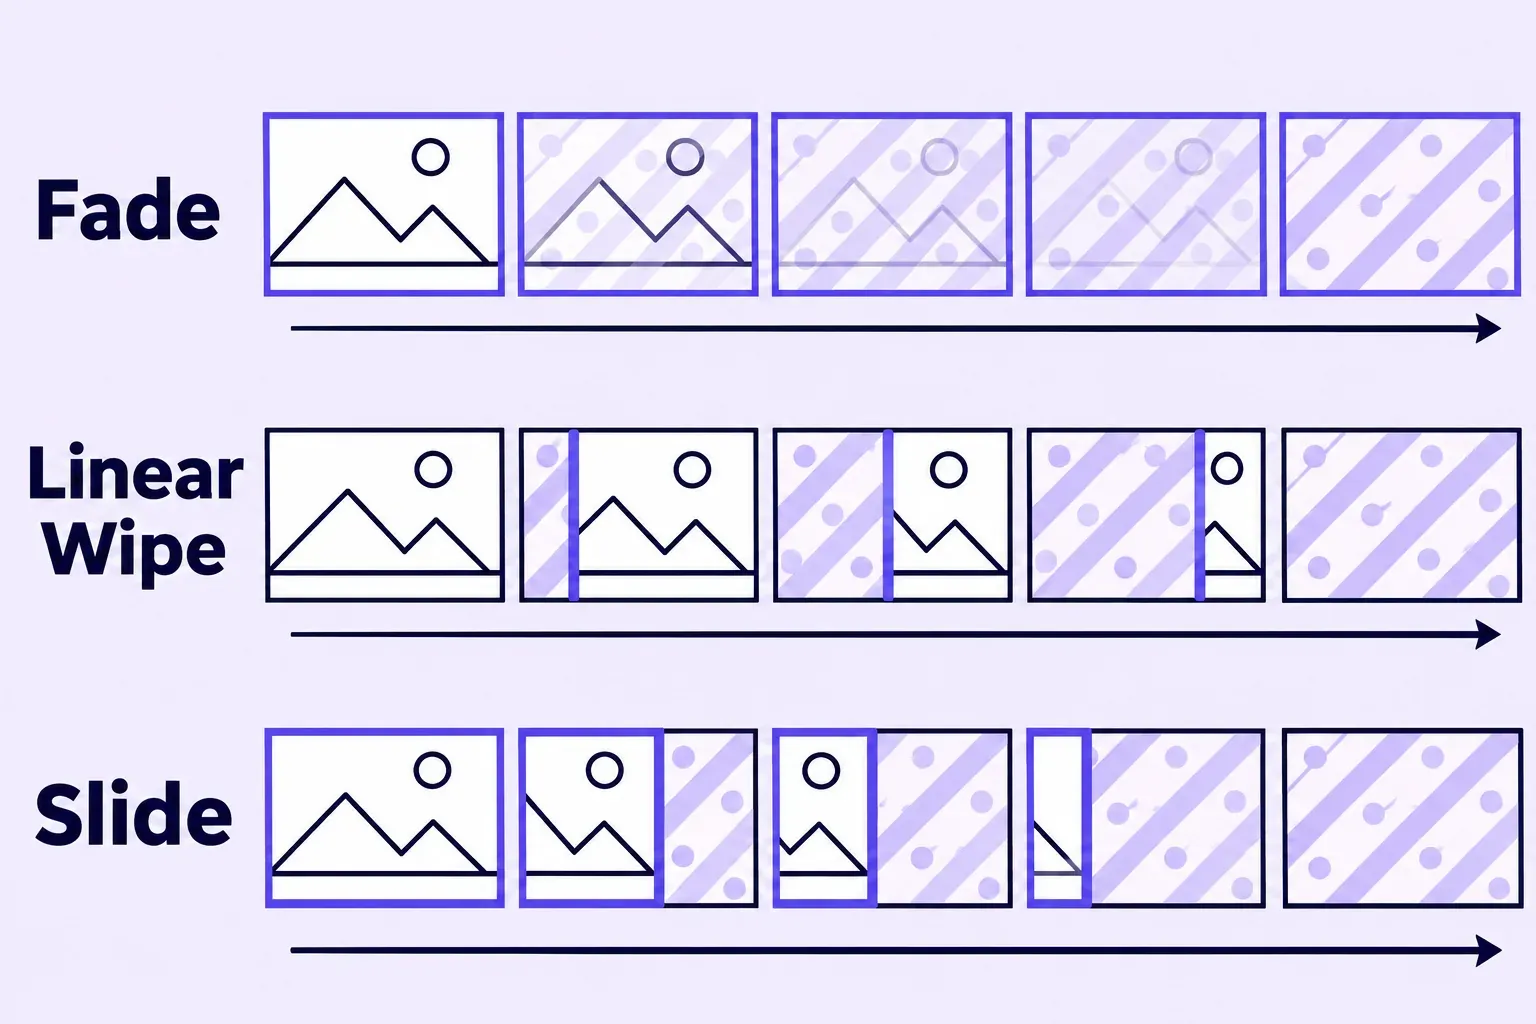
Overlap a row of clips with Sequence Layers
With more than two clips, After Effects can arrange the overlaps. Each selected layer must be shorter than the composition. Select the layers in playback order, beginning with the first shot, then choose Animation > Keyframe Assistant > Sequence Layers. The first selected layer keeps its time. Select Overlap, enter its Duration and choose Cross Dissolve Front And Back Layers or Dissolve Front Layer. Adobe's Sequence Layers instructions explain that the first option uses both layers' transparency. Leaving Overlap off places the layers end to end; a negative Duration leaves gaps.
Press U on the sequenced layers and inspect the Opacity keys the assistant added. Keep and retime those keys for a dissolve. Before substituting a wipe or slide, remove only the assistant-created dissolve keys and restore the affected Opacity values to 100%; preserve any animation that belongs to the shot. Save a project copy before changing an existing edit.
Fade: Opacity from 100% to 0% on shot A
The manual builds assume the property you are about to animate has no existing keys or expression. Inspect U or UU first if the shot is already animated. Enable the stopwatch once, then change values at later frames. Turning an active stopwatch off deletes every keyframe on that property; pressing it again does not restore them.
- Select shot B and press I to park the indicator on the first shared frame. Click shot A and press T so its Opacity is the only property showing.
- With Opacity unanimated, set it to 100%, then click its inactive stopwatch once. A diamond appears at the first shared frame.
- With A still selected, press O to reach its Out point and change Opacity to 0%. The active stopwatch makes After Effects add the second keyframe automatically.
- Check: drag the indicator through the overlap or press Spacebar to preview. A should be fully visible on the first shared frame and gone on the last, while B underneath stays fully opaque. With linear timing, A is about half transparent in the middle.
That pair fades A away to reveal B. Linear temporal interpolation gives a constant rate of change; easing the keys changes how the fade builds and settles. Keep B fully opaque for this build.
For a fade with a colour in the middle there are presets. Adobe's effects and animation presets reference lists Fade - dip to black, Fade - flash to white and Fade - overexposed in Transitions - Dissolves, Fade In Over Layer Below, Fade Out Over Layer Below and Fade In+Out - frames in the Behaviors folder, and Fade In and Fade Out among the IN and OUT presets of the Adobe Express folder. That list gives names only, not which layer a preset hides or how many frames it runs, so press U after applying one and read its keyframes before trusting it at a cut.
Wipe: Transition Completion from 0% to 100%
- Select shot B and press I, then select shot A and apply Linear Wipe: choose Effect > Transition > Linear Wipe, or type part of the name into the Effects & Presets search box and double-click the result. A double-click applies an effect only to selected layers; with no layer selected it does nothing.
- Press E to show A's effects in the Timeline, expand the newly applied Linear Wipe and, with Transition Completion at 0% and unanimated, click its inactive stopwatch once.
- Set the direction before the second keyframe. A Wipe Angle of 90° sends the edge from left to right, so B appears on the left first. The effect's feather setting softens the edge; at Best quality the edge is anti-aliased and the feather smooth, while at Draft quality the edge is not anti-aliased.
- With A selected, press O and set Transition Completion to 100%. A second diamond appears at A's Out point.
- Check: scrub the overlap. The edge should start moving on the first shared frame, and on the last no strip of A should remain anywhere in the frame.
Radial Wipe takes the same two keys on Transition Completion but sweeps around a point: Start Angle sets where the sweep begins, with 0° at the top. Its Wipe setting chooses clockwise, counterclockwise or alternating between the two, as Adobe's Radial Wipe controls specify.
Iris Wipe animates its radius instead
Iris Wipe uses Outer Radius, plus Inner Radius when Use Inner Radius is selected, instead of Transition Completion. It forms an iris with 6 to 32 points; a radius of 0 hides the iris, and equal inner and outer radii make it roundest. Set and check the radius values at both endpoints so the first frame shows A and the final frame shows B, then scrub between them. For a simple wipe with explicit 0% and 100% endpoints, I'd use Linear Wipe or Radial Wipe.
Gradient Wipe follows a gradient layer
Gradient Wipe clears shot A in the order set by the brightness of another layer in the same composition: dark pixels go first and light ones last, and Invert Gradient reverses that. In Adobe's own example a gradient running from black on the left to white on the right uncovers the layer underneath from left to right. To build that gradient:
- Press Ctrl + Y (Windows) or Command + Y (macOS) for a new solid that covers the frame, then choose Effect > Generate > Gradient Ramp, which sets its start and end positions with Start Of Ramp and End Of Ramp. Put the start at the left edge in black and the end at the right edge in white.
- Select the gradient solid and press Ctrl + Shift + C (Windows) or Command + Shift + C (macOS). Choose Move all attributes into the new composition, so Gradient Ramp remains on the solid inside the precomp. Using that rendered precomp as the input keeps the gradient in the pixel data that Gradient Wipe reads; Adobe's control-layer guidance describes this way of including a control layer's effects, masks and transforms.
- Drag the precomp to the bottom of the stack, under shot B, so B covers it for the whole overlap.
- Apply Gradient Wipe to shot A, choose the precomp as its gradient layer and keyframe Transition Completion from 0% to 100% across the overlap, as with Linear Wipe. Transition Softness above 0% lets each pixel pass through partly transparent stages instead of switching from opaque to clear, and Gradient Placement tiles, centres or stretches the gradient over A.
- Check: a few frames into the overlap, B should show at the left edge first. If it shows on the right, swap the ramp's colours or select Invert Gradient.
The gradient layer can be any still or moving image in the composition, so an ink texture or a cloud plate can drive the wipe in place of the ramp.
The other built-in transitions
The Transition category holds seven native effects. Colour depth matters only in a 16 or 32 bpc project.
| Effect | What happens to shot A | Keyframe | Depth |
|---|---|---|---|
| Linear Wipe | A straight edge crosses at the Wipe Angle | Transition Completion | 8, 16, 32 bpc |
| Radial Wipe | An edge sweeps round a point from Start Angle | Transition Completion | 8, 16, 32 bpc |
| Iris Wipe | An iris of 6 to 32 points opens | Outer Radius (and Inner Radius) | 8, 16, 32 bpc |
| Gradient Wipe | Pixels clear in order of a gradient layer's brightness | Transition Completion | 8, 16 bpc |
| Block Dissolve | Random blocks vanish, width and height set separately | Transition Completion | 8, 16 bpc |
| Venetian Blinds | Strips of a set direction and width open | Transition Completion | 8, 16 bpc |
| Card Wipe | A grid of cards flips to show a Back Layer | Transition Completion | 8 bpc only |
Block Dissolve's blocks have soft edges at Best quality and sharp ones at Draft. Card Wipe's Back Layer can be any layer in the composition, even one with its Video switch off, and a Back Layer carrying effects or masks should be precomposed first. Ten more transitions ship in the same category: CC Glass Wipe, CC Grid Wipe, CC Image Wipe, CC Jaws, CC Light Wipe, CC Line Sweep, CC Radial ScaleWipe, CC Scale Wipe, CC Twister and CC WarpoMatic, and typing CC into the search box lists them. Adobe's page on the CC effects included with After Effects gives one line on each and does not list their controls, so press E after applying one and find the property that drives the change before setting keyframes.
Slide, push and zoom with Position and Scale
A slide moves A out of the frame. For the numeric example, use an unparented 2D shot whose bounds fill the composition exactly, with a centred anchor, no rotation or other transform effects, and no Position keys or expression. In a 1920-pixel-wide comp, a centred X of 960 becomes -960 when A moves one full comp width left. If your layer has different geometry, move it until its right edge clears the left edge of the composition instead of copying those numbers.
- Select shot B and press I. Select shot A, press P and click the inactive Position stopwatch once to key its centred value.
- With A selected, press O and change only the X value, subtracting the composition's width (960 becomes -960 in the example). A second keyframe appears.
- Check: on the last shared frame no part of A is left inside the frame, and B has sat still underneath throughout.
A push moves B in while A leaves. With B using the same full-frame, neutral 2D geometry, set its X to its centred value plus the comp width on the first shared frame: 2880 in this example. Enable its Position stopwatch once, move to the last shared frame and change X to the centred value, 960. Check that the two edges stay together throughout the move. Both layers now have timing to keep in step when you retime the push.
A zoom uses Scale (S). For a shrink reveal, start with A filling the composition and an unanimated Scale property. Key its fitted starting scale on the first shared frame, then set Scale to 0% on the last; A closes to a point over B. Enlarging A towards the viewer still leaves it covering B, so pair that zoom with the Opacity fade described above.
Repeat a zoom with one adjustment layer
I'd put a repeating zoom on an adjustment layer because its timing then lives in one place above the edit. This build magnifies each shot around a plain cut; it does not move A out while B moves in. Both shots must already fill the frame. An effect on an adjustment layer affects every layer below it, so keep titles or other layers that should stay still above it. Adobe's Transform effect provides its own Anchor Point, Position, Rotation, Scale and Opacity, plus Skew and Skew Axis.
- Press Ctrl + Alt + Y (Windows) or Command + Option + Y (macOS) for a new adjustment layer. Place it above both footage layers and below any titles you want to leave unaffected.
- Trim it to the move: indicator on the frame where the move begins, Alt + [ or Option + [; indicator on the frame where it ends, Alt + ] or Option + ].
- Apply Effect > Distort > Transform to the adjustment layer and press E. At the adjustment layer's In point (I), set Transform's Scale to 100% and enable its inactive stopwatch. Move to the cut frame and raise Scale, then go to the adjustment layer's Out point (O) and return it to 100%. The later value changes create the other keys.
- Check: both shots are magnified around the cut, Scale returns to 100% at the final key, and outside the adjustment layer's bar the edit has its original scale. Duplicate and reposition this layer when another cut needs the same zoom timing.
Transform can use its own shutter angle for motion blur when motion blur is enabled for both the layer and the composition. This can give a fast zoom a visible blur along its movement. Transform works in 8 and 16 bpc.
Extend a shot before a transform with Motion Tile
If a stylized transform should keep the same shot filling the frame while exposing its edges, Motion Tile can extend that shot with repeated pixels. Apply Effect > Stylize > Motion Tile to the footage or precomp carrying the picture, then place Transform below it on that same layer. Effects run from top to bottom, so the repeated image feeds Transform. Output Width and Output Height are percentages of the input layer. Enable Mirror Edges with Phase at 0 to mirror the boundaries, as Adobe's Motion Tile controls specify. Increase the output dimensions only as far as the move needs, and inspect every edge through the animation: repeated subjects can be visible. Motion Tile works in 8 bpc. Keep it off the individual-layer slide above, where uncovering B is the intended result.
Preview and apply transition presets
Open Effects & Presets with Ctrl + 5 on Windows or Command + 5 on macOS. Adobe's built-in preset list includes these three transition folders:
- Transitions - Dissolves: the three Fade presets, Dissolve - blobs, dither, ripple, sand, unmelt and vapor, Block Dissolve - digital, random and scanlines, Inky Dissolve and Pixelated Dissolve.
- Transitions - Movement: Slide - drop, straight, swoop and variable; Zoom - 2D spin, 3D tumble, bubble, spiral and wobbling; Card Wipe - 2D fractured, 3D pixelstorm and 3D swing; Fly to Inset; Stretch & Slide.
- Transitions - Wipes: Linear Wipe, Radial Wipe - bottom and top, Clock Wipe, Barn Doors, Band Wipe, Checker Wipe, Wedge Wipe and Venetian Blinds.
- Preview before applying. Animation > Browse Presets, also available in the Effects & Presets panel menu, opens the visual browser in Adobe Bridge. Bridge must be installed for this route. With A selected, double-clicking a preset in Bridge applies it; the Effects & Presets panel route below works without Bridge.
- Or apply from the panel. Select B and press I, select A, then search Effects & Presets for part of the preset name, such as "swoop" or "clock". Double-click the preset or drag it onto A. The preset is applied at the current time; inspect its resulting animation before choosing the actual transition endpoints.
- Or skip the panel. Quick Apply was added in After Effects 26.2. With shot A selected and the indicator on the first shared frame, press Cmd + Return on macOS or Ctrl + Enter on Windows (the lightning bolt icon in the Timeline panel does the same) to bring up Quick Apply. Type p: followed by part of the preset name, select a result and press Enter to apply it to A. To browse only presets without a prefix, open Settings (the wrench icon) and leave Animation Presets selected while clearing Effects and Menu Commands.
- Read what arrived. Press U on A to show properties with keys or expressions, or UU for modified properties. Inspect the first and last meaningful states and scrub through the overlap. Check which shot the preset reveals or hides. Keep the intended edit and overlap; move or retime the relevant keys rather than trimming A to whichever key happens to be last. Expressions can control timing beyond the visible keys, so check them too.
- Back out if it is wrong. Undo straight after applying is the cleanest exit. Later, preserve a project copy and remove only the unwanted changes. Effect > Remove All (Ctrl + Shift + E or Command + Shift + E) clears every effect on the selected layer, including unrelated ones; it leaves keys on the layer's own properties. Adobe notes that an applied animation preset cannot be removed as one unit.
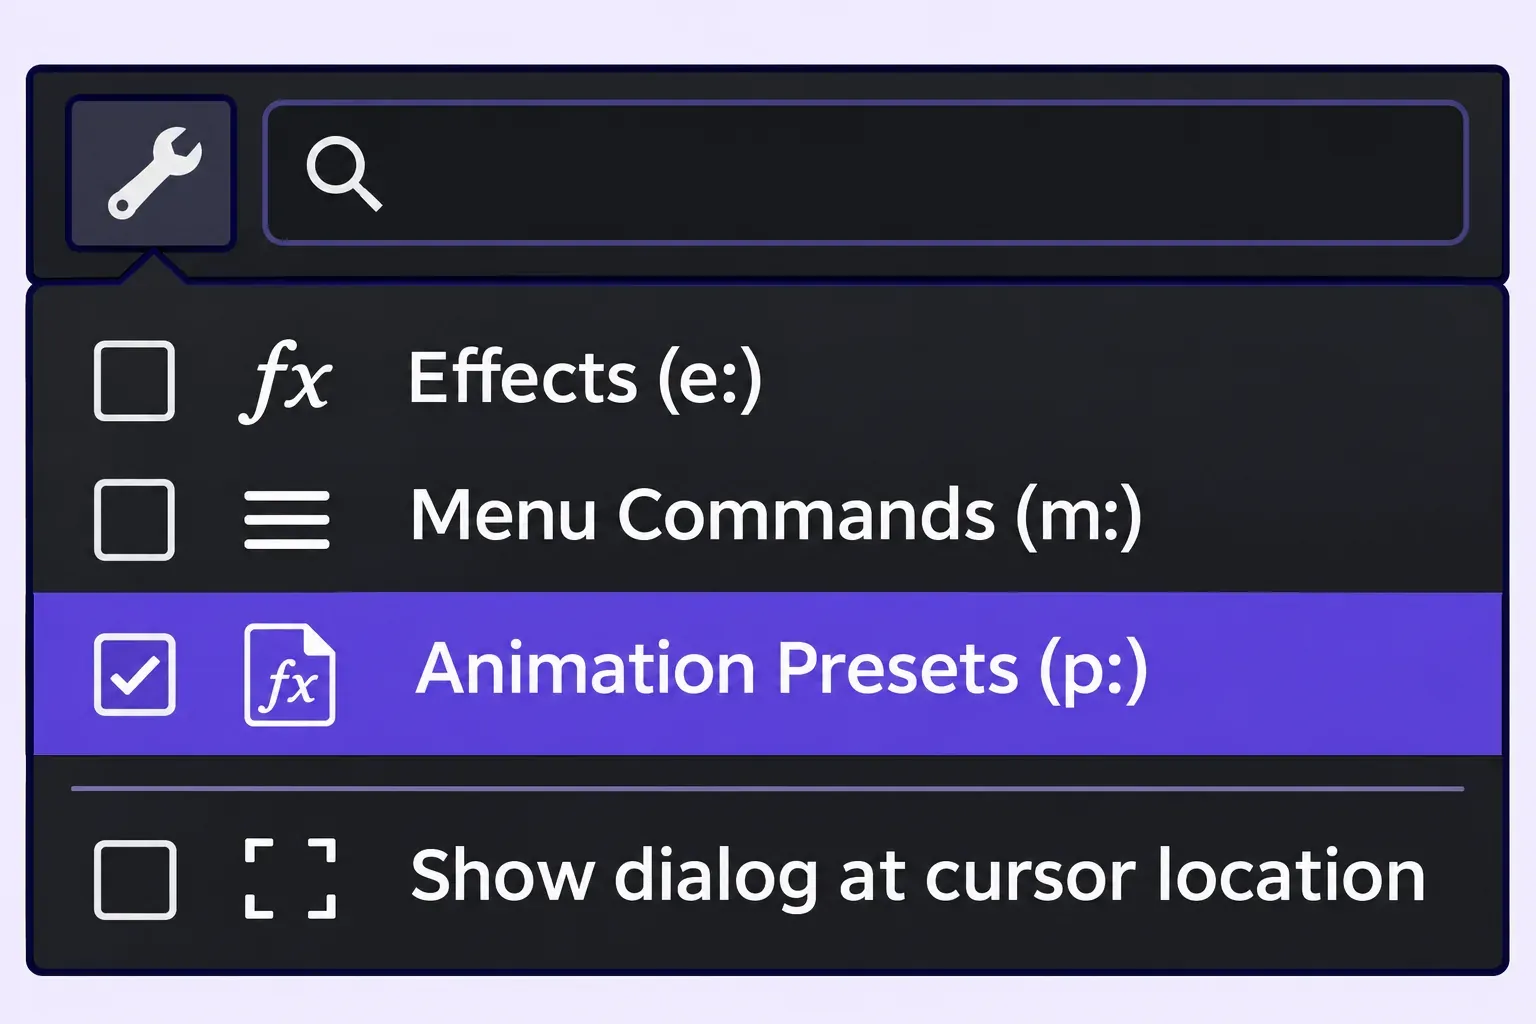
If Effects & Presets is hidden, choose Window > Effects & Presets before searching for a preset. Keep the target footage layer selected when applying it.
Save a transition as your own preset
Once the endpoints work at one cut, select all properties and effects needed for that transition, including its Opacity fade if the look uses one, and choose Animation > Save Animation Preset. After Effects stores the selected keys and expressions in an .ffx file. Save it inside the user Presets folder under Documents/Adobe/After Effects on macOS or My Documents\Adobe\After Effects on Windows; a preset saved elsewhere does not appear in the panel merely because you choose Refresh List. After saving in Presets, use Refresh List if needed. At the next cut, select the intended layer and apply the preset at the current time, then inspect and align its meaningful states as above.
Free After Effects transitions and paid packs: what to check first
An After Effects transitions pack is somebody else's project, preset or template, and what it asks of you later depends on four things its own page should state. If the maker's page cannot show them, skip the pack; a "free" archive rehosted on a download site carries no licence you can rely on.
- Licence. Read the terms for the item's actual category. Mixkit's Video Templates Free License permits commercial and non-commercial projects without attribution for items marked with it, subject to Mixkit's User Terms. For Video Templates, the Envato Elements licence requires a licence for each separate project and completion of the end product during an active subscription; that completed use remains covered after cancellation. Redistribution of the item as stock or in another template is prohibited, even for free. Fonts and Add-ons have separate installation terms, so do not apply the Video Templates rule to every downloaded preset or tool.
- Version. Packs arrive as projects (.aep, or .aepx in XML form) or template projects (.aet), and a project belongs to the version that saved it. Adobe's page on After Effects projects documents saving a copy for the previous major version, with features that version lacks ignored in the copy; it does not say an older version opens a newer file. Match the version the pack names to the one you run, and treat a missing version line as a warning.
- File type. An .ffx is an animation preset for the Effects & Presets panel; an .aep or .aet is a project you open and copy layers out of; a .mogrt is a Motion Graphics template exported from the Essential Graphics panel for editing in Premiere Pro. Adobe's Motion Graphics templates page says some of them need After Effects installed to customise, and File > Open Project opens a .mogrt in After Effects by extracting its project.
- Plug-ins. Read the maker's dependency list and verify each required plug-in against the After Effects version and operating system on every computer that will open the project. A pack labelled "no plug-ins required" avoids that particular dependency, but fonts and external assets may still need attention. Adobe's Motion Graphics template requirements also distinguish templates that need After Effects installed from those designed to work without it; the latter cannot use third-party plug-ins.
Check the pack's included fonts and media as well as its plug-ins before handing the project to someone else. Keep the item's licence record with that project.
When Premiere Pro places a transition faster
For repeated dissolves in a changing edit, I'd keep the cut in Premiere Pro: its default transitions apply directly to edit points. Its default shortcuts are Ctrl + D (Cmd + D) for the video transition, Ctrl + Shift + D (Shift + Cmd + D) for audio, and Shift + D for both defaults on the selection. Adobe's default-transition instructions name Cross Dissolve and Constant Power Crossfade, show Sequence > Apply Default Transitions to Selection for touching selected clips, and put the duration in Timeline preferences. Trim the clips to leave spare footage for the transition.
The same keys do something else in After Effects: Ctrl + Shift + D or Command + Shift + D splits the selected layer and adds no transition. An edit carried across also keeps only part of its transitions. When a Premiere project is imported into After Effects, or its clips are pasted in, a cross dissolve arrives as Opacity keyframes and every other transition becomes a solid layer at its original place and length, per Adobe's page on importing from Premiere. Those solids are placeholders to replace with one of the builds above.
Before reusing the move, check its first frame, last frame and the frames just outside it. The hand-off should show only A at the start, only B at the end, and no unexpected jump back to A.