After Effects vs Premiere Pro: which one to use for which job
Premiere Pro, now called Adobe Premiere, cuts shot footage into a finished video; After Effects builds what the footage lacks: animated graphics, keys, tracked inserts and composites. A job-by-job table, then a lower third and a keyed shot followed through both apps, with what each crossing needs.

Use Premiere Pro to cut footage into a finished video, with dialogue, colour and captions. Use After Effects to build animated graphics and layered visual effects, then return those shots to the edit. I'd learn Premiere first for an interview or vlog because the whole programme needs to be cut and timed to sound; I'd start with After Effects for a logo animation or a graphic someone else will edit.
Clips on a sequence, layers in a composition
Adobe separates editing from motion graphics and compositing. Premiere's sequence holds the edit: clips arranged across video and audio tracks. An After Effects composition stacks layers to build an image over time, with properties such as Position, Scale, Opacity, mask paths and effect settings. A composition can contain many shots or graphics, and a Premiere sequence can contain animation too. The useful distinction is which app gives you the controls for the job.
That is why the cut lives in Premiere and the animation lives in After Effects, and why the project files do not stand in for each other. Premiere brings a live After Effects composition into a sequence through Dynamic Link, and Premiere Help on importing After Effects compositions says that needs After Effects installed on the same system.
Job by job: which app to open
Choose by what the work needs next. A simple title or key can stay inside Premiere; detailed animation and composites benefit from After Effects' layer and property controls.
| Job | Open | What to look for |
|---|---|---|
| Cut a vlog, interview or social edit | Premiere | Text-Based Editing |
| Clean up recorded dialogue | Premiere | Enhance Speech |
| Colour the whole video | Premiere | Lumetri Color panel, Lumetri Scopes, LUTs |
| Colour one shot inside a composite | After Effects | Colour correction on that layer |
| A single title | Premiere | Type tool, Properties panel |
| A lower third used through a series | Premiere for a simple design; After Effects for richer animation | Reusable .mogrt template with controls for the editor |
| An animated logo | After Effects | Shape and text layers, keyframes per property |
| Green screen, evenly lit, clean edges | Premiere | Ultra Key |
| Green screen with fine hair, spill or a moving background | After Effects, then Premiere | Keylight + Key Cleaner + Advanced Spill Suppressor, linked back through Dynamic Link |
| Blur or isolate a moving face or subject | Premiere | Object Mask, mask tracking |
| Pin text or a graphic to something that moves | After Effects | Point tracker, Mocha AE |
Cutting, dialogue and captions
A long cut belongs in Premiere because the sequence is built for arranging footage and sound. Text-Based Editing and Enhance Speech add transcript-based cutting and dialogue cleanup. After Effects can trim and split layers, which is useful for a few cuts inside an animation, but a long edit creates a large layer stack. The steps for that smaller job are in cutting a clip in After Effects.
Colour
Adobe's comparison guide calls Premiere often the better choice for colour, with its scopes and LUTs. In the regular Premiere app those sit in two panels.
For one clip in the cut, select it in the timeline with the playhead over it, then open Basic Correction in Lumetri Color. The Light group holds the tonal controls shown below. The same section offers white balance controls and an Input LUT menu. To refine the look, Creative applies Looks and Curves provides curve controls. Color Wheels & Match offers further adjustments.
The Lumetri Scopes panel (Window > Lumetri Scopes) holds the Vectorscopes, Histogram, Parade and Waveform that Premiere Help on Lumetri Scopes lists. Use the scopes to judge the signal while adjusting colour in Lumetri Color. I prefer to grade the cut once the shot order has settled, so I can compare neighbouring shots in their edit order.
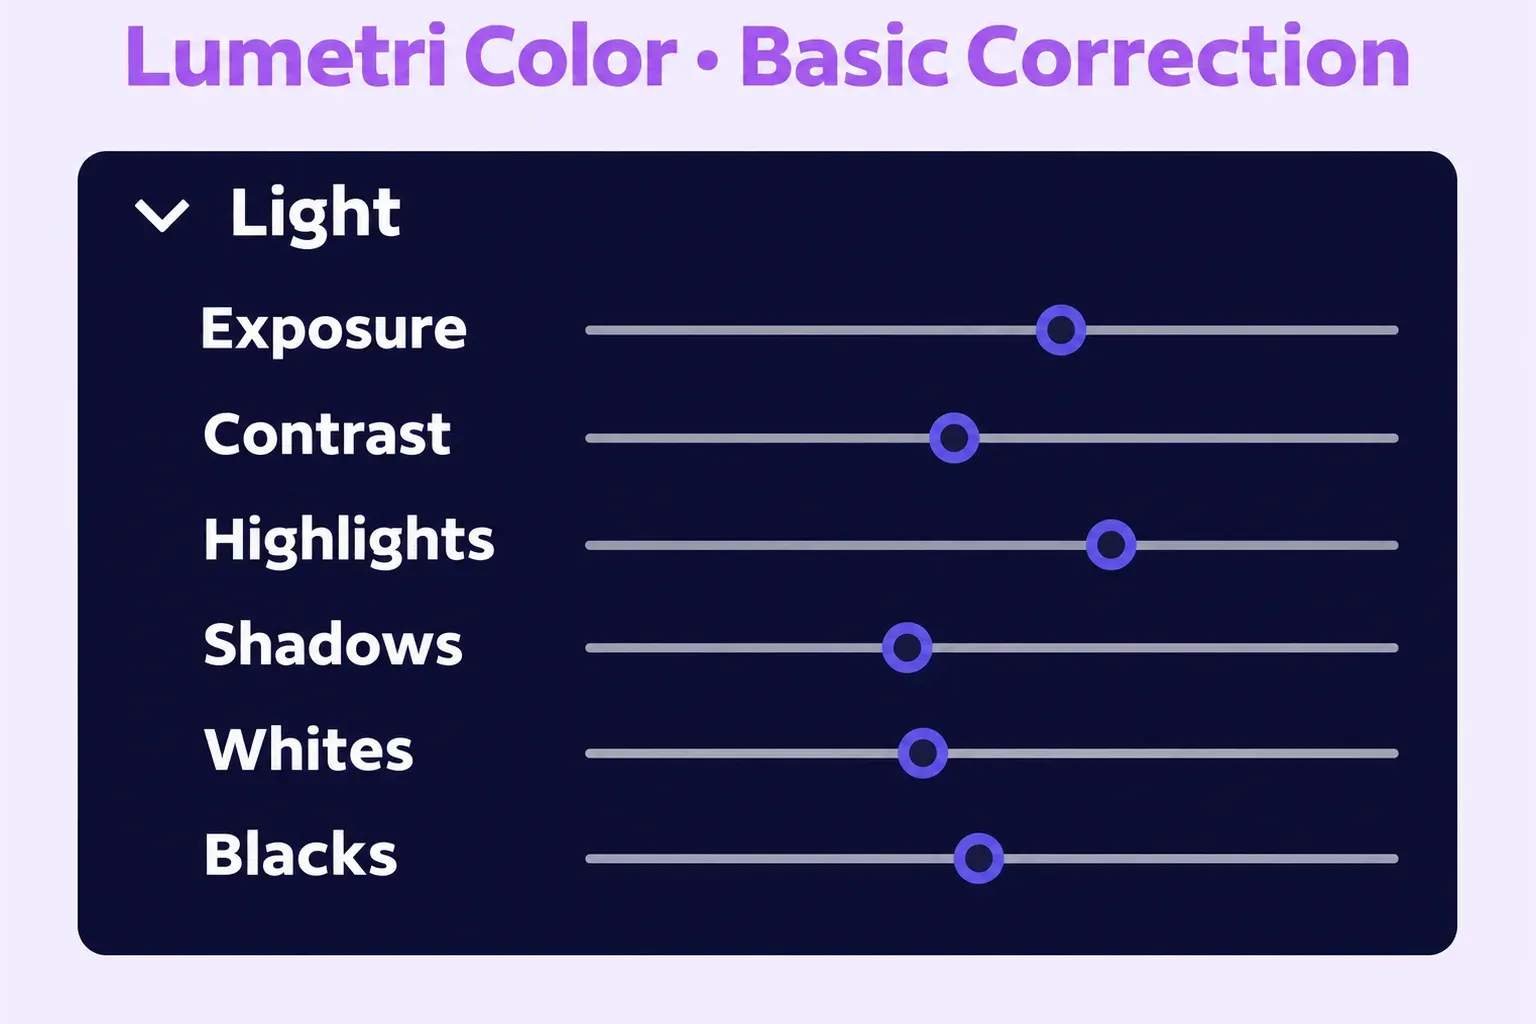

After Effects colour-corrects too, and it is the right place for a shot that already sits inside a composite, where the keyed subject and its new background have to match each other before the edit ever sees them.
Color mode, the grading workspace Adobe's Premiere page introduces, belongs to Premiere (beta), the separate app Adobe offers for testing, and Adobe's Help on Color mode says it is not recommended for client work yet; the same page says the Lumetri panel is being retired starting with Premiere 27.0, while the Lumetri Color effect stays available.
Titles, lower thirds and logos
A single title needs no second app. Premiere Help on creating titles has you type it with the Type tool in the Program Monitor, then right-click the title and choose Edit Properties to set fonts, colours, outlines and alignment in the Properties panel.
For a simple recurring name bar, Premiere can build the graphic and export a template. Choose After Effects when the design needs detailed layer animation, text animators or a composite behind the title. Its Motion Graphics template workflow lets you expose the controls an editor needs without handing over the whole animation.
Green screen
Premiere keys with Ultra Key. In the Effects panel open Video Effects > Keying > Ultra Key and apply it to the clip, pick the screen colour with the Key Color eyedropper in Effect Controls, then refine with the Matte Generation, Matte Cleanup and Spill Suppression groups and the Output menu, as Premiere Help on Ultra Key sets out. In After Effects, Adobe's keying advice is to try Keylight first and follow it with Key Cleaner and Advanced Spill Suppressor, which are available together as the animation preset Keylight + Key Cleaner + Advanced Spill Suppressor in the Image-Utilities category.
I'd keep an evenly lit shot with clean edges in Premiere, because the key then stays on the clip inside the cut and no file has to travel. A shot with wispy hair, motion blur or green light on the subject, or one whose new background has to move with the camera, is a composite: it goes to After Effects through Dynamic Link, and removing a green screen in After Effects covers the key itself.
Something that moves in the shot
To blur a face or treat one subject in a clip, Premiere is enough. Its Object Mask, as Adobe's Premiere page describes it, lets you hover over a subject and click, and the AI masks and tracks it. Masks drawn on a clip track from Effect Controls with Track bi-directionally, Track Forward and Track Backward; a vector mask can follow Position, Scale, Rotation and Perspective, and Premiere's page on mask tracking points out that this tracking is not an AI feature.
After Effects can attach a layer to movement in footage with its point tracker. Mocha AE is included for planar tracking, with entry points at Effect > Boris FX Mocha > Mocha AE and Animation > Track in Boris FX Mocha. For separating a moving subject, Object Matte uses the same AI technology as Premiere's Object Mask and provides selection and edge-refinement tools in the Layer panel.
One lower third through both apps
A lower third is the plainest case for owning both apps: designed once in After Effects, filled in many times in Premiere. It crosses as a .mogrt file, and what the editor may change is decided before that file leaves After Effects.
Before the first step, the lower third is built in its own composition in After Effects (a text layer for the name, a shape layer for the bar), that composition is open in the Timeline panel, and Premiere is installed on the computer where the template will be used.
- With the lower-third composition active, choose Composition > Open in Essential Graphics, or Window > Workspace > Essential Graphics, as After Effects Help on Motion Graphics templates describes. You should see the Essential Graphics panel with the Export Motion Graphics Template button at its bottom.
- Drag each property the editor will change from the Timeline panel into the Essential Graphics panel: here the name text and the bar's colour. Help describes this for supported properties, so not every property on a layer can become a control. The same Help page says only the controls you expose can be customised in Premiere, so anything you leave out stays as built. Check that each control now shows in the panel.
- Click Export Motion Graphics Template and choose the destination: Creative Cloud Libraries, the Local Templates Folder or a Local Drive. The result is a .mogrt file at that destination.
- In Premiere, choose Window > Graphics Templates. If the .mogrt was exported to a Local Drive, select Install Motion Graphics template in the panel's upper-right corner, choose the file and select Open. Templates in Creative Cloud Libraries are available automatically. In My Templates, drag the template onto a video track above the footage; the lower third should appear over the shot in the Program Monitor.
- Select the template on the track and use the Edit tab of the Properties panel to change the exposed name and colour. Check both changes in the Program Monitor. The template's custom controls come from step 2; the clip still has its placement and timing in the Premiere sequence.
In current Premiere, browse templates in Graphics Templates and edit an instance in Properties. Older instructions may call the Premiere panel Essential Graphics; After Effects still uses that name for authoring the template.
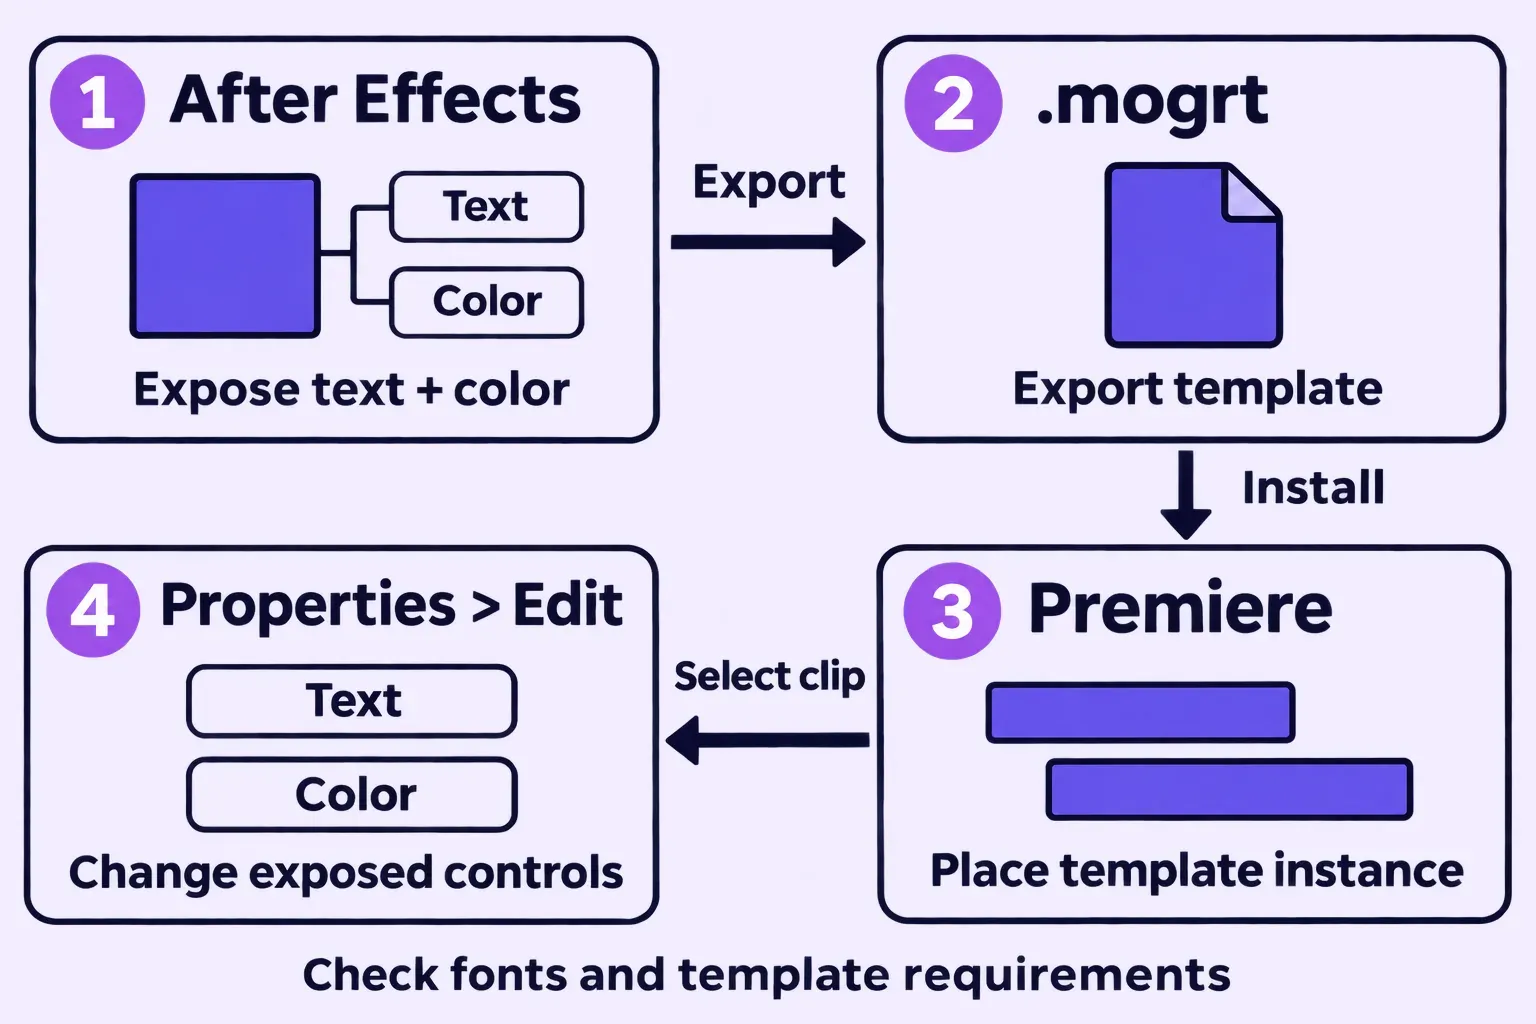

From then on the lower third depends on three things, and each one is worth checking before the template goes to an editor.
- The exposed controls. A change to anything else means opening the After Effects project, changing it there and exporting the template again.
- The template's fonts on the editor's computer. The tip in Premiere Help on adding a template to a sequence says fonts the template needs but the computer lacks can be resolved in Premiere, and that the media shows as offline until the template finishes loading.
- After Effects itself, for some templates. A template works in Premiere without After Effects installed only when it uses the Classic 3D renderer, leaves out Camera-Shake Deblur, Synthetic Aperture Color Finesse, Maxon CINEWARE, Puppet and Warp Stabilizer, and holds no Dynamic Link footage, FLV files or third-party plug-ins.
I'd package a recurring lower third as a template because every editor then starts with the same design. Expose the changes they need, such as the name and bar colour; keep the animation's construction in the After Effects project.
A graphic made in Premiere can be packaged without After Effects: Premiere Help on exporting a graphic as a template gives Graphics and Titles > Export Motion Graphics template, or right-click > Export As Motion Graphics Template. That route does not work for .mogrt files first created in After Effects, and it is unavailable while two or more graphics are selected. Check a ready-made template's font and plug-in requirements before sending it to an editor.
One keyed shot through both apps
A green-screen shot that needs a real composite is the other crossing, and here nothing gets exported. The clip on the Premiere timeline is replaced by a composition stored in an After Effects project, and Adobe's After Effects page says Dynamic Link brings that composition in without intermediate rendering.
Before making a live link, check that After Effects is installed on the Premiere computer. Adobe also requires matching app versions for Dynamic Link; update the pair together and check compatibility before sharing the project. Have the Premiere sequence open with the green-screen clip on a video track, and save a project copy before replacing it.
- In the Premiere timeline, select the clip, right-click it and choose Replace With After Effects Composition. After Effects opens if it is not already running and creates a new linked composition from the clip; if it shows a Save As dialog for its project, name the project and save it, since that .aep is now where the shot lives. On the Premiere track, the clip is replaced by the linked composition.
- In After Effects, key the clip in that composition (Keylight first, as above) and put the new background on a layer below it. Save the After Effects project.
- Back in Premiere, play the sequence. The shot plays keyed over its new background with no render or export step between the apps.
- For a later change, select the clip in Premiere and choose Edit > Edit Original, which opens the composition in After Effects.
Other entries to the link sit in the same menus. In Premiere, File > Adobe Dynamic Link > New After Effects Composition starts an empty linked composition and File > Adobe Dynamic Link > Import After Effects Composition brings in one that already exists; in After Effects, File > Adobe Dynamic Link > New Premiere Sequence and Import Premiere Sequence link in the opposite direction.
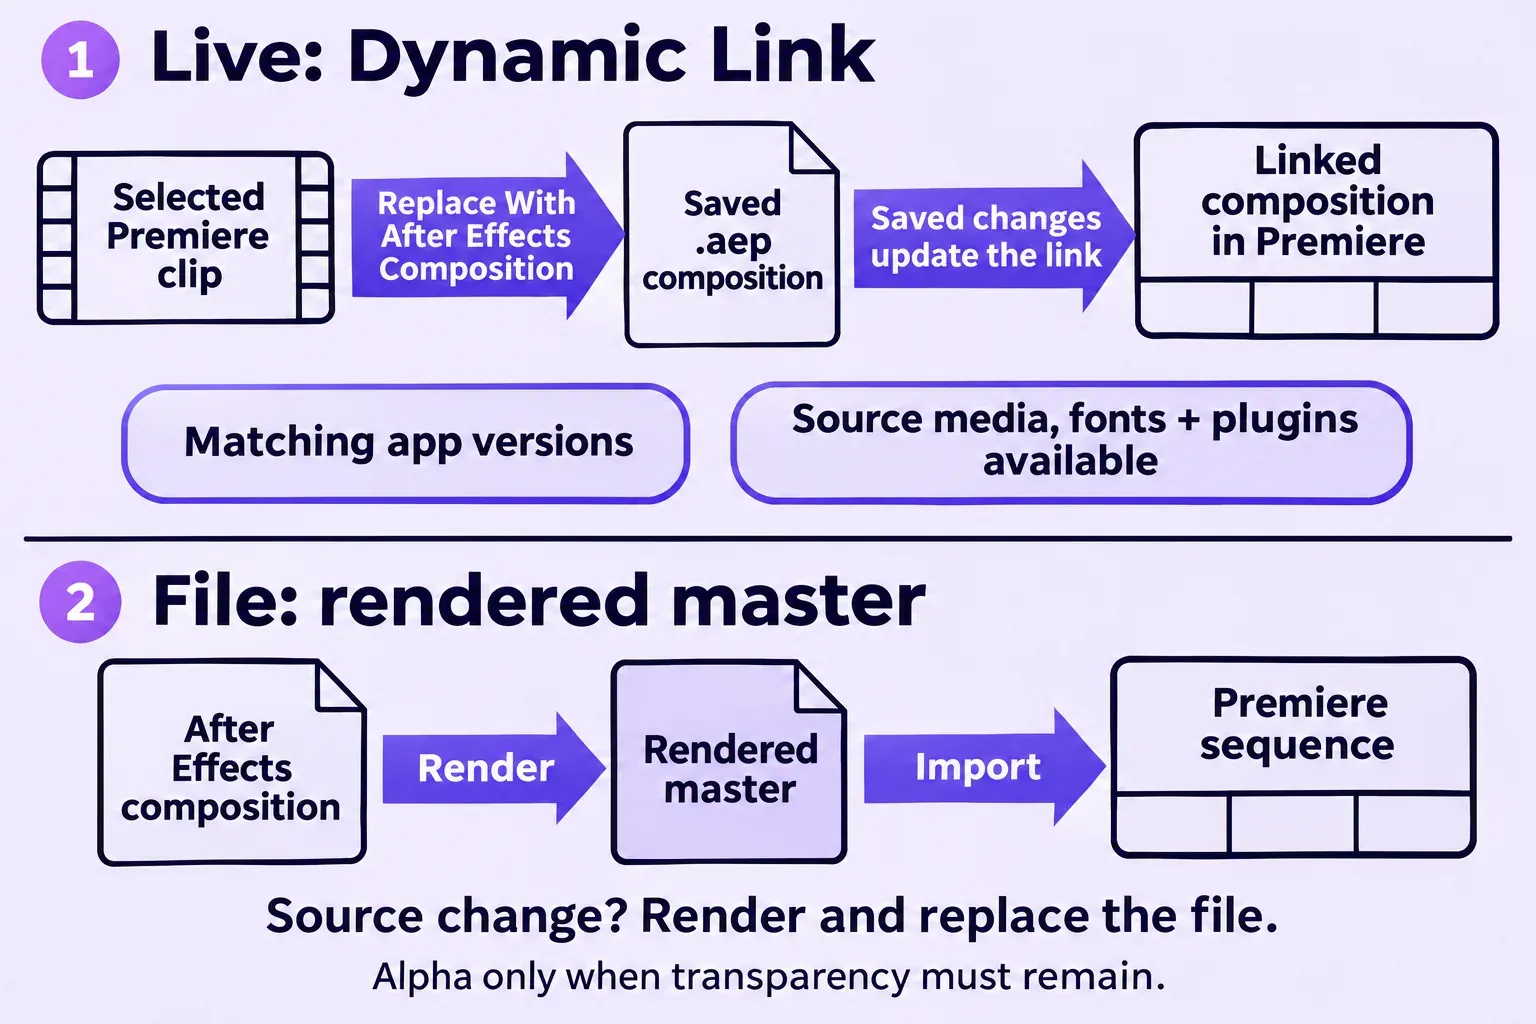

A live linked composition depends on the After Effects project, its media and the required fonts or plug-ins, as well as a compatible After Effects installation on the computer evaluating it. Share those dependencies with an editor who needs the live shot. If playback slows, Clip > Render and Replace substitutes a rendered file in Premiere. Taking the composition offline or disabling the clip also stops live evaluation, but doesn't provide a finished picture in its place.
Without Dynamic Link: hand over a rendered master
For a handoff that won't depend on a live After Effects project, render a master and import it into Premiere. A different computer can use Dynamic Link when its app installation and project dependencies are in place; a master is the simpler choice when the editor only needs the finished picture. Use the Render Queue or Composition > Add to Media Encoder Queue, then choose a master format for the next edit. If the new background stays in Premiere, preserve alpha in a format that supports it. The settings are in exporting a video from After Effects. Changing a baked key later means returning to the source project and rendering a replacement.
Moving a whole cut into After Effects
Sometimes the cut itself has to cross, for example when an opening title is timed against an edit that is already locked. In After Effects, File > Import > Adobe Premiere Project brings the project in without Dynamic Link, and After Effects Help on importing from Premiere lists what survives: clip order, trims, markers, where transitions sit, and common effects with their keyframes. Titles and every transition apart from dissolves come in as solid layers holding their places, ready to be rebuilt. The same page sets one condition: After Effects can't import a Premiere project if one or more of its sequences are already dynamically linked to After Effects, so check a project that has been through Dynamic Link before you import it.
Copy and paste handles smaller pieces. Premiere clips paste into a composition with Edit > Paste, and Ctrl + Alt + V (Command + Option + V on macOS) pastes them at the current-time indicator; Premiere titles cannot be pasted. In the other direction Premiere has to be running before you copy in After Effects, shape, text, camera, light and adjustment layers cannot be copied, and expressions, masks and mattes are not converted. Adobe keeps the full list of routes between the two apps, from text templates to converting selected clips into a composition, on the same page on After Effects and other applications quoted near the top.
Can After Effects edit a whole video, and can Premiere animate?
Both apps can cut and splice clips, but Premiere is built around assembling footage into a finished programme. Choose it for a conventional edit. After Effects can handle a short piece built mostly from animated graphics.
Premiere can animate a clip with keyframes and style a title in Properties. A graphic built there can also become a template. Choose After Effects when the shot needs a more involved composite or animation built from many layers.
Which to learn first
For a video cut from footage, start in Premiere and time the sequence to sound. For an animated logo or a template for someone else's edit, start in After Effects. Begin with one composition, then animate a layer by changing a property between keyframes.
One app or both: plans and hardware
Adobe offers Premiere on its own or in Creative Cloud Pro with After Effects. Buy for the work you need now: one app is enough when it produces the deliverable, while live links and After Effects template authoring can justify both. Compare the local plan price, commitment and cancellation terms before choosing an annual plan billed monthly.
- Premiere alone fits an editor who cuts footage, cleans dialogue, adds captions, grades and sets simple titles, as long as any templates arriving from designers are ones that run without After Effects installed.
- After Effects alone fits a designer who delivers graphics, templates or composited shots as files that someone else edits.
- Both fit anyone who cuts and also builds their own graphics or keys, and anyone who wants Dynamic Link, which needs the two apps on one computer at matching versions.
On the hardware side, the After Effects 26.5 system requirements set a minimum of 16 GB of RAM on Windows and on macOS. Premiere's technical requirements, covering the Premiere 26.x releases through 26.5.2, start lower: 8 GB of RAM on Windows and macOS for editing HD video (16 GB on Windows on Arm), with 16 GB recommended for HD media and 32 GB or more for 4K on Windows, and 16 GB of unified memory recommended on Apple silicon. An 8 GB configuration that meets Premiere's HD memory minimum therefore falls short of After Effects' 16 GB minimum, and more RAM is also one of the remedies Adobe's Dynamic Link page names for slow linked playback.
RAM headroom in a published test
The memory minimums above are a starting requirement. In Puget Systems’ June 2026 RAM-capacity test, After Effects’ overall benchmark score at 16 GB was 43% lower than at 64 GB. Premiere’s overall scores differed by 7% between 16 GB and the 32/64 GB runs. Both apps’ overall results were close at 32 GB and 64 GB.
Puget used a Ryzen 9 9950X3D2 Dual Edition workstation with an RTX 5080 and 64 GB of DDR5-5600, running Windows 11 Pro 26200. Windows boot limits restricted its available memory for the 16 GB and 32 GB runs; the RAM modules stayed in place. The app versions were After Effects 26.2.1 with Puget Bench 1.1 and Premiere 26.2.2 with Puget Bench 2.0.1. Those suites measure different work, so compare each app against its own 64 GB result. I’d plan above the minimum for After Effects, because the 16 GB configuration lost a large share of its score in this test.